Images contain numerical values that must be somehow stored on the hard disc or within the computer memory. To do so, for each pixel a certain amount of space (memory) must be allocated (usually measure in bits). Generally, the more bits you allocate, the bigger are the numbers that you can store, however, you also need more space. Thus choosing the right data type usually is a balance between what you can represent and how much space you want to afford for this. Especially, for large image data such as volume EM and light-sheet data, the choice of the data type can have quite some impact on your purse. In addition, certain operations on images can yield results with values outside of the original data type; this is a serious and frequently occurring source of mistakes when handling image data and thus must be well understood!
Prerequisites
Before starting this lesson, you should be familiar with:
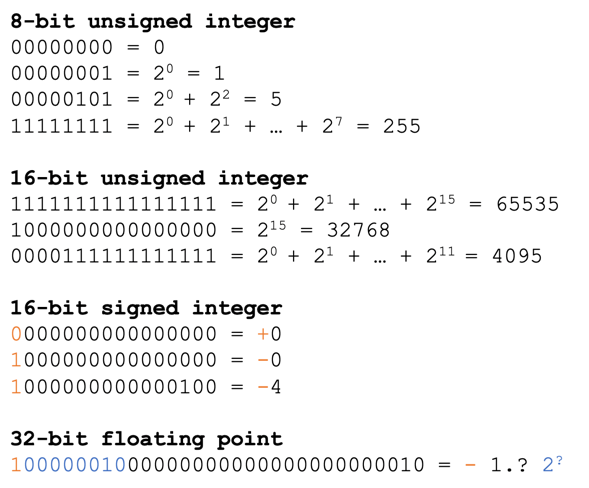
The pixels in an image have a certain data type. The data type limits the values that pixels can take.
Unsigned integer data types
Many microscopes save their data in the unsigned integer datatype.
A pixel of an N-bit unsigned integer data can be between 0 and 2^N - 1.
For example
8-bit unsigned integer: 0 - 255
12-bit unsigned integer: 0 - 4095
16-bit unsigned integer: 0 - 65535
Intensity clipping (saturation)
If the value of a pixel in an N-bit unsigned integer image is equal to either 0 or 2^N - 1, you cannot know for sure whether you lost information at some point during the image acquisition or image storage.
For example, if there is a pixel with the value 255 in an unsigned integer 8-bit image, it may be that the actual intensity “was higher”, e.g. would have corresponded to a gray value of 302. One speaks of “saturation” or “intensity clipping” in such cases.
It is important to realise that there can be also clipping at the lower end of the range (some microscopes have an unfortunate “offset” slider that can be set to negative values, which can cause this). Typically, images with clipping at the lower feature large regions where all pixel values are 0. In general this is bad, because many image analysis operations (such as object intensity measurements) require knowledge of the background intensity of the image. This background intensity cannot be measured in images that are clipped.
Observe that this is an 8-bit image with saturation issues, i.e. many pixels of value 255
Show activity for:
skimage napari
# %%
# Check for saturation in an 8-bit image
# %%
# Import libraries and instantiate napari
importnapariimportnumpyasnpimportmatplotlib.pyplotaspltfrombioioimportBioImageviewer=napari.Viewer()# %%
# Open an image and view it
image=BioImage('https://github.com/NEUBIAS/training-resources/raw/master/image_data/xy_8bit__nuclei_intensity_clipping_issue_a.tif')image=image.data.squeeze()viewer.add_image(image)# TODO: This would be nice https://forum.image.sc/t/add-hilo-colormap-to-napari/95601
# %%
# Check the image's datatype
print(image.dtype)print(np.iinfo(image.dtype))# Useful as it also prints the value range
# %%
# Check for clipping, i.e. pixels values at the limits of the value range
# This is important for many reasons, for example:
# - Pixel values at the limit of the value range typically cannot be used for intensity quantification
# - Important algorithms, e.g. for spot detection, do not work well in regions with intensity clipping
print("Min:",image.min())# Are there any clipped pixels?
print("Max:",image.max())# Are there any clipped pixels?
print("Number of 0 pixels:",np.sum(image==0))# How many clipped pixels are there?
print("Number of 255 pixels:",np.sum(image==255))plt.hist(image.flatten(),bins=np.arange(int(image.min()),int(image.max())+1).tolist())plt.show()# %%
# Close the viewer (CI test requires this)
viewer.close()plt.close('all')# %%
Saturation, i.e. pixel value at the upper end of the datatype, is a typical problem in fluorescence microscopy images.
Inspecting 12-bit images, as acquired by some camera based systems, is particularly tricky, because 12-bit images are typically represented as 16-bit images, both on disk and within analysis software.
Observe that while this opens as 16-bit image there are many pixels at the highest value of 4095, which is the maximum of a 12-bit image.
Show activity for:
skimage napari
# %%
# Check for saturation in a 12 bit image
# %%
# Import libraries and instantiate napari
importnapariimportnumpyasnpimportmatplotlib.pyplotaspltfrombioioimportBioImage# %%
# Open an image and view it in napari
image=BioImage('https://github.com/NEUBIAS/training-resources/raw/master/image_data/xy_12bit__saturated_plant.tif')image=image.data.squeeze()viewer=napari.Viewer()viewer.add_image(image)# %%
# Napari:
# - Hover with the mouse to look for saturation
# %%
# Check the image's datatype
print(image.dtype)print(np.iinfo(image.dtype))# Useful as it also prints the value range
# %%
# Check for clipping, i.e. pixels values at the limits of the value range
# This is important for many reasons, for example:
# - Pixel values at the limit of the value range typically cannot be used for intensity quantification
# - Important algorithms, e.g. for spot detection, do not work well in regions with intensity clipping
print("Min:",image.min())# Are there any clipped pixels?
print("Max:",image.max())# Are there any clipped pixels?
# %%
# Compute the maximal value of various data types,
# and observe that, suspiciously, our image's maximum value
# matches that of a 12-bit image
print("8 bit max:",2**8-1)print("12 bit max:",2**12-1)print("16 bit max:",2**16-1)# %%
# Check how many satured pixels we have in the 12 bit image
print("Number of 4095 pixels:",np.sum(image==4095))# %%
# To double check that this really is a 12 bit image
# you can try to inspect the image metadata
# - If you open the image in Fiji you can do: Image > Show Info
# - TODO: find out how to do this in python
# %%
# Close the viewer (CI test requires this)
viewer.close()plt.close('all')
This activity shows that correctly handling binary images can be tricky because there typically is no dedicated binary datatype for storing images on disk.
Observe that this an unsigend 8-bit integer image, where only two of the possible 256 gray values used. Thus, in practice this probably represents a binary image.
Show activity for:
skimage napari
# %%
# Open and inspect a binary image
# %%
# Import libraries and instantiate napari
importnapariimportnumpyasnpimportmatplotlib.pyplotaspltfrombioioimportBioImageviewer=napari.Viewer()# %%
# Open image and view it
image=BioImage('https://github.com/NEUBIAS/training-resources/raw/master/image_data/xy_8bit_binary__h2b.tif')image=image.data.squeeze()viewer.add_image(image)# %%
# Check the image's datatype and values
# - From the datatype alone we cannot tell that this is a binary image (aka a mask)
# - But the fact that it only has two values suggests that it in fact is a binary image
print(np.iinfo(image.dtype))print("Min:",image.min())print("Max:",image.max())print(np.unique(image))# %%
# Convert to a boolean binary image
# - For working with this mask in python it will be probably more convenient to convert it to a boolean type image
# - The issue is that boolean type images cannot be saved as such on disk, because e.g. TIFF does not support this datatype
binary_image=(image==255)print(image.shape,binary_image.shape)# ensure we did not mess up the shape
# np.iinfo is not implemented for bool
print(binary_image.dtype)print(np.unique(binary_image))# %%
# Close the viewer (CI test requires this)
viewer.close()plt.close('all')# %%
For all software that we tested this image is opened as an unsigned integer 16-bit image with a value range from 32963 to 36863
In fact, this image is a 12-bit image that has an offset of 2^15, probably due to a misinterpretation of the first bit
2^15 = 32768 (minimal possible value, which does not occur in this particular image because there is some background)
2^15 + 2^12 - 1 = 36863 (maximal value possible in this image/datatype)
Check how many saturated pixels there are
Show activity for:
skimage napari
# %%
# Explore the pixels values of an image acquired with a 12-bit camera
# %%
# Import libraries and instantiate napari
importnapariimportnumpyasnpimportmatplotlib.pyplotaspltfrombioioimportBioImageviewer=napari.Viewer()# %%
# Open image and view it
image=BioImage('https://github.com/NEUBIAS/training-resources/raw/master/image_data/xy_16bit__scanR_datatype_issue.tif')image=image.data.squeeze()viewer.add_image(image)# %%
# Check the image's datatype and value range
# - The intensity values reside "strangely" in the middle of the 16 bit data type range
print(image.dtype)dtype_min=np.iinfo(image.dtype).mindtype_max=np.iinfo(image.dtype).maxprint(dtype_min,dtype_max)print(image.min(),image.max())plt.hist(image.flatten(),bins=np.arange(dtype_min,dtype_max+1).tolist())plt.yscale("log")plt.show()# %%
# This is a bit advanced/annoying
# but here's how to shift the image values to be better interpretable
# and then how to check for saturation
image_rescaled=image-2**15# remove offset due to misinterpretation of the first bit (signed/unsigned)
print(image_rescaled.min(),image_rescaled.max())print(0,2**12-1)# print uint12 data range, which is the range of the camera the image was acquired with
print(np.sum(image_rescaled==2**12-1))# check number of saturated pixels
# %%
# Close the viewer (CI test requires this)
viewer.close()plt.close('all')
The RGB datatype occurs when using colour cameras. Moreover RGB images are important in the context of deep learning applications which are often trained on and operate on RGB images.
Observe how the RGB datatype is represented numerically (this can be different for different software)
Show activity for:
skimage napari
# %%
# Inspect and visualise an RBG images
# %%
# Import libraries and instantiate napari
importnaparifrombioioimportBioImageviewer=napari.Viewer()# %%
# Open and inspect the image
image=BioImage('https://github.com/NEUBIAS/training-resources/raw/master/image_data/xy_rgb__cells.tif')image=image.data.squeeze()print(image.dtype)# The datatype is uint8 (not rgb)
print(image.shape)# The RGB components are represented as a third dimension
# %%
# View the image
# By default, if the last dimension of an image is of size 3 or 4,
# napari will interpret the image as an RGB or RGBA image
viewer.add_image(image)# If you don't want to treat it as RGB
# you have to set rgb=False
viewer.add_image(image,rgb=False)# After opening the image, use the napari UI
# to change the axes order such that you can see the image
# There's now a slider below the image to change which color component
# of the RGB image you are looking at
# %%
# Close the viewer (CI test requires this)
viewer.close()
This image clips intensities at low gray scale levels (many zeros in the image).
This is problematic as the data could be seen as if there is no DNA within some places of the nuclei, which most likely would be the wrong biophysical interpretation.
Even though this is an unsigend 8-bit integer image there are only two of the possible 256 gray values used. Thus, in practice this probably represents a binary image.
In fact, the highest value in the image is 1200 which is less than 4095, thus, maybe this image was actually acquired with a 12-bit camera or some other bit-depth less than 16.
In general, working with bit-depths between 8 and 16 is a bit problematic because there is not much support in terms of file formats and analysis software. Thus in the process one may loose track of the original bit-depth of the image.
This image is stored as an unsigned integer 16-bit image.
The range of the data is from 32963 to 36863
In fact, this image is a 12-bit image that has an offset of 2^15.
2^15 = 32768 (minimal possible value, which does not occur in this particular image because there is some background)
2^15 + 2^12 - 1 = 36863 (maximal value possible in this image)
This example, which is produced by a real commercial microscope, again demonstrates that interpreting 16 bit images can be tricky, as they may actually be of a lower bit depth.
Show activity for:
skimage napari
# %%
# Explore image data types and value ranges
# %%
# Import libraries and instantiate napari
importnapariimportnumpyasnpimportmatplotlib.pyplotaspltfrombioioimportBioImageviewer=napari.Viewer()# %%
# Open an image and view it
image=BioImage('https://github.com/NEUBIAS/training-resources/raw/master/image_data/xy_8bit__nuclei_intensity_clipping_issue_a.tif')image=image.data.squeeze()viewer.add_image(image)# https://forum.image.sc/t/add-hilo-colormap-to-napari/95601
# %%
# Check the image's datatype
print(image.dtype)print(np.iinfo(image.dtype))# Useful as it also prints the value range
# %%
# Check for clipping, i.e. pixels values at the limits of the value range
# This is important for many reasons, for example:
# - Pixel values at the limit of the value range typically cannot be used for intensity quantification
# - Important algorithms, e.g. for spot detection, do not work well in regions with intensity clipping
print("Min:",image.min())# Are there any clipped pixels?
print("Max:",image.max())# Are there any clipped pixels?
print("Number of 0 pixels:",np.sum(image==0))# How many clipped pixels are there?
print("Number of 255 pixels:",np.sum(image==255))plt.hist(image.flatten(),bins='auto')plt.show()#image = BioImage('https://github.com/NEUBIAS/training-resources/raw/master/image_data/xy_8bit_binary__h2b.tif').data.squeeze()
#image = BioImage('https://github.com/NEUBIAS/training-resources/raw/master/image_data/xy_16bit__autophagosomes.tif').data.squeeze()
image=BioImage('https://github.com/NEUBIAS/training-resources/raw/master/image_data/xy_16bit__scanR_datatype_issue.tif').data.squeeze()# View the image
viewer.add_image(image)# %%
# Check the image's datatype and its value limits
print(np.iinfo(image.dtype))# Check the image's minimum and maximum intensity
print(np.min(image),np.max(image))# %%
# Close the viewer (CI test requires this)
viewer.close()plt.close('all')
ImageJ GUI
For each image mentioned in the activity perform the below tasks.
Open the image in Fiji.
Use various ways to inspect the image and verify the comments that are given below the respective image in the activity.
To this end, useful tools are:
Image › Show Info...
Inspect pixel values by hovering over the image with the mouse.
Observe that for some software the datatype of the loaded image does not match the datatype given in the metadata.
The reason is that some software only support data types where the bit depth is a multiple of 8. For example, unsigned integer 12-bit data may not be supported.
This is very important as you may misinterpret whether your image contains saturated pixels or not.
Open the image using Plugins > Bio-Formats > Bio-Formats Importer
Select [X] Display OME-XML metadata
Click [ OK ]
Check whether the information in Image > Type is the same as the one mentioned in the displayed metadata (look for SignificantBits and Type)
Also check the maximum value in the image, e.g. using Analyze > Histogram
How does this maximum value compare to the image datatype?
For example, you may find a value of 4095, which is the maximum of an unsigned integer 12-bit image, which may be the datatype mentioned in the image metadata, however ImageJ may represent this image as a 16-bit image. Appreciate that this can be confusing!
If you find the maximum of the image to be identical to maximum that the datatype of the image can represent you may have an issue with saturation! Check this
by hovering with the mouse over bright regions
using the HiLo LUT with appropriate contrast settings, i.e. the maximum should be the maximum of your datatype!
Assessment
True or false? Discuss with your neighbor!
Changing pixel data type never changes pixel values.
Converting from 16-bit unsigned integer to 32-bit floating point never changes the pixel values.
Changing from 32-bit floating point to 16-bit unsigned integer never changes the pixel values.
There is only one correct way to convert from 16-bit to 8-bit.
If the highest value in an image is 255, one can conclude that it is an 8-bit unsigned integer image.
If the highest value in an image is 1034, one can conclude that it is not an 8-bit unsigned integer image.
If the bit-depth is 16 and there are a lot of neighboring pixels with the value 4095 and no pixels with a higher value, most likely this image was acquired with 12-bit camera.