Smart microscopy targeted imaging
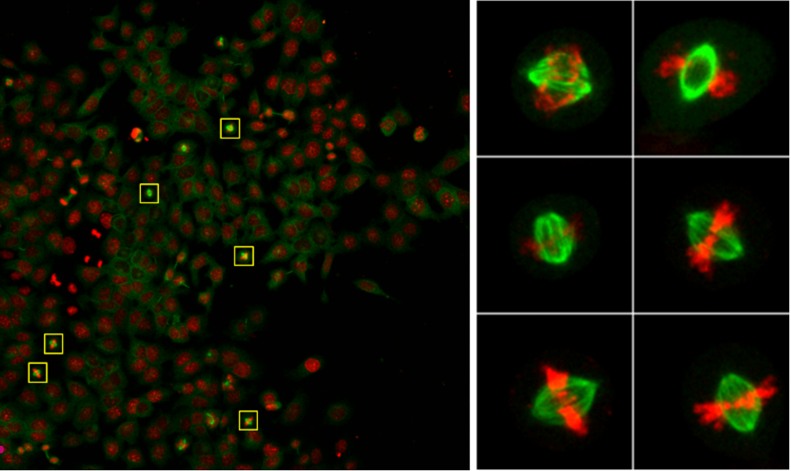
High-resolution imaging of large samples is a very time-consuming process. In many biological studies high-resolution microscopy data are not required for the entire sample, but only for specific areas. For example, often only sub-population of cells showing particular phenotype need to be imaged at high resolution. Manual selection of target areas is a laborious process and requires constant involvement of experimenters. Automating such experiments with smart (adaptive feedback) microscopy enables running such experiments in high-throughput manner without any user supervision. Image processing is done via pre-defined image analysis routine, which ensures unbiased and reproducible selection of imaged objects.
Prerequisites
Before starting this lesson, you should be familiar with:
No programming or engineering knowledge is required
Know how to operate a microscope
Learning Objectives
After completing this lesson, learners should be able to:
Understand basic feedback microscopy workflow for automatically finding target objects and re-imaging them at high resolution
Understand essential steps in constructing and testing such a workflow
Learn which use cases would be appropriate for such workflow and possible limitation
Concept map
Figure
Activities
Basic targeted acquisition workflow
- Manual configuration and test at the microscope
- Setup imaging settings for low zoom and high zoom acquisition jobs
- (If available) Save all settings as imaging jobs (observation methods) in microscope software
- Acquire and save example images for testing and debugging image analysis
- Image analysis
- Define or re-use image analysis function implementing threshold-based segmentation of nuclei
- Use acquired images to test segmentation parameters
- Configure and run feedback microscopy pipeline
- Define default positions for the feedback microscopy (the same as positions for screening)
- Configure selected feedback microscopy tool (see implementations) by linking pre-configured acquisition settings and segmentation protocol as parameters.
- Run the pipeline
Show activity for:
Automic Tools with Zeiss ZEN
Hardware and software requirements
This implementation required Zeiss microscope controlled by ZenBlue software. Macro programming module is not required, although preferential to simplify changing parameters of Zen macro.
Installation
- Install Fiji with AutoMicTools package on microscope running PC using these guidelines.
- Install zeiss_zenbLue_automation package using these guidelines.
Step-by-step guidelines
- Set up imaging settings
- Define settings for low zoom and high zoom imaging
- Each time activate “Tiles” option
- Save settings as “Experiment setups” in ZenBlue
- Set up image analysis
- Download example Fiji macro and open it in Fiji (drag-and-drop)
- Take example low zoom image and open it in Fiji (drag-and-drop)
- Test macro by running it. As a result, segmented ROIs should be added to image overlay.
- Start AutoMicTools distributor in Fiji
- [ Plugins › Auto Mic Tools › Applications › Imaging › AF LowZoom HighZoom - script]
- Parameters of the first dialogue (General JobDistributor parameters):
- Image File Extension: czi
- Experiment Folder: {path to experimental folder where data will be stored}
- Microscope Commander: ZenBlueCommander
- Other parameters: default values
- Second dialogue (processing parameters for autofocus job): keep all by default
- Third dialogue (processing parameters for low zoom job):
- Script path: path to the Fiji macro tested in step 2
- Configure parameters of ZenBlue script and run it
- (Optional) Simulate acquisition workflow using pre-acquired data
Zeiss ZEN Guided Acquisition
Introduction
This workflow employs the Guided Acquisition UI Tool in ZEN (Figure 1). It follows a fixed workflow, where an overview scan is followed by an image analysis block and several detailed scans. Positions (FOVs) of the detailed scans are derived from the image analysis. To keep the user interface simple, the user plugs in pre-configured experimental and image analysis settings for the three main steps.
Besides simplifying usability, this comes with the benefit that all available acquisition modes and other built-in features (like Deep Learning segmentations) also seamlessly work with GA. The user can furthermore add certain optional components, e.g. additional processing steps for the raw overview image, or manually adjust the number of detailed scans. Time-lapse acquisitions can be defined to allow for detection of sparse events. GA also is compatible with image data correlation via ZEN Connect, or high throughput well plate experiments.
Pre-requisites
- Zeiss Imaging instrument (e.g. AxioObserver, LSM)
- ZEN blue as the imaging control software
- Smart Acquisition Toolkit
Detailed guidelines
Overview Scan
For setting up the overview scan, the user must navigate to the “Acquisition” tab and create a new acquisition setting. Within the workflow, the overview scan serves first and foremost the detection of ROIs for targeted acquisition. Hence, image quality must be sufficient to reliably detect the desired phenotype, but imaging settings should otherwise be chosen to keep scan time and data sizes as slim as possible. There is several ways of reducing acquisition effort in this step:
- only acquire channels that are strictly required for ROI identification
- employ a low-magnification objective or binning
- only acquire a number of tiles that guarantees detecting your desired number of ROIs / phenotypes, not more
- avoid large stacks
Image Analysis
For the detection of events or phenotypes, the GA module employs the ZEN-internal Image Analysis. This gives the user many choices concerning segmentation methods, object hierarchies and feature filtering. Hence, it offers high flexibility in pursuing hard-to-detect phenotypes or events. For setting up the image analysis, the user must navigate to the “Image Analysis” tab. The wizard-like tool will lead through the setup in a step-wise fashion.
- [Segmentation Method] When creating a new analysis setup, the user can choose between default 2D segmentation methods, Zone-of-influence (an automatic detection of nuclei and cell bodies) and 3D segmentation.
- [Segmentation Classes] Next, the segmentation classes can be defined, hence, the types of objects-of-interest (e.g. nuclei, whole cells, organelles, or nuclear speckles). These can also be defined in a hierarchy to increase specificity of results (e.g. “nuclear speckles” within “nuclei”. For every class, the underlying image channel can be adjusted
- [Segmentation Algorithm] Then, the segmentation algorithm is defined. Here, the Image Analysis Wizard offers great flexibility. Threshold-based segmenters (manual and automatic), variance-based segmenters, ML-based segmenters (Intellesis) and DL-based segmenters are available. The user can further do some limited pre-processing, rudimentary object filtering and morphological operations (e.g. watershed object splitting)
- [Feature Filtering] Then, the detected objects can be further selected via feature filters. Combining features allows for high specificity. Cut-off values can be typed in manually or defined interactively by including / excluding desired objects in the image pre-view.
- [Result features] Finally, result features can be defined. These are features that are measured and reported back to the user after execution of the image analysis. In the context of GA, these features allow for a selection of detailed scans. E.g. a user might want to create detailed images only from the 5 largest nuclei (feature: “Area”) of a data set.
Detailed Scan For setting up the detailed scan, the user must navigate to the “Acquisition” tab and create a new acquisition setting. The detailed scan is the final result of the GA workflows, the setup should guarantee “optimal” image quality. This may include e.g.
- use of high-resolution objectives
- tuning up illumination or exposure times to guarantee optimal SNR
- z-stacks with small stack intervals (to allow for high-quality 3D data and DCV post-processing)
- an optimized autofocus strategy
Guided Acquisition User Interface Some settings are done directly in the GA user interface. These include the following parameters:
- [Acquisition and Analysis setups] The setups done above (Overview Scan, Image Analysis, Detailed Scan) can be chosen from respective drop-down lists.
- [Objective Settings] Objectives for overview and detailed scans are defined not in the experiment, but directly in the GA user interface.
- [Autofocus Settings] Some global autofocus settings can be set by checkboxes.
- [Pre-processing] The user can add some image pre-processing performed before image analysis, to increase the specificity of object detection. Available methods include Apotome Processing, DCV, Airyscan Processing, Shading correction and Extended-Depth-of-Focus.
- [Detailed Scan pre-selection] The number of detailed scans can be defined, as well as the required ordering based on object features (e.g. detailed scan from the 5 largest nuclei).
- [Settings for Rare Event detection] The user can activate repeated acquisition and set the number of cycles and the time intervals
- [Output Folder] The storage folder for images, settings and data tables can be defined. Alternatively, the user may create a “ZEN Connect” project to store the data there.
Nikon JOBS
Introduction
This workflow for targeted imaging is built in JOBS, the smart microscopy acquisition workflow module of NIS-Elements. A job organises tasks into a visual program. The key tasks used here are a low resolution image capture, an image analysis of the low resolution image to segment target objects, a list storing the segmented objects, a loop over that list, and finally a high resolution capture of each target.
--- config: layout: elk --- flowchart TD subgraph Setup [" "] direction LR L["Define low-resolution capture
Lo_Res"]:::setup H["Define high-resolution capture
Hi_Res"]:::setup end O["Capture overview image
using Lo_Res"]:::capture A["Analyse overview image
identify target regions"]:::analysis F{"For each target region"}:::loop T["Capture high-resolution image
using Hi_Res"]:::capture R(["Output target images"]):::finish L --> O H --> T O --> A A --> F F --> T T -->|Next region| F F -->|All regions complete| R classDef setup fill:#eef2ff,stroke:#818cf8,color:#1e1b4b; classDef capture fill:#ecfeff,stroke:#22d3ee,color:#164e63; classDef analysis fill:#f5f3ff,stroke:#a78bfa,color:#3b0764; classDef loop fill:#fff7ed,stroke:#fb923c,color:#7c2d12; classDef finish fill:#fefce8,stroke:#facc15,color:#713f12; style Setup fill:none,stroke:none;This description assumes working familiarity with NIS-Elements. A fuller walkthrough, including how to set up the simulated camera, is being published separately on protocols.io.
Hardware and software requirements
- Nikon microscope with a motorised XY stage, controlled by NIS-Elements.
- JOBS module (licensed) for defining the acquisition workflow.
- General Analysis for segmentation of the target objects. General Analysis is standard in NIS-Elements; General Analysis 3 is a licensed addition and is not required for this workflow.
- Two objectives, e.g. 4x / 0.2 NA for the low resolution overview and 40x / 0.95 NA for the high resolution acquisition.
- No microscope is needed to build and test the job: a camera can be simulated with standard NIS-Elements, which allows safe virtual testing on saved images. A Nikon representative can set this up if it is not already configured, and setting up the simulator will be described on protocols.io.
Practical requirements before you start
- This example job was designed for a standard slide with DAPI staining. However, any sample with a robust, bright stain can be substituted.
- The low and high resolution image parameters are stored in
capture definitiontasks, which each call an optical configuration. The optical configurations must be preset with appropriate hardware settings — filter set, LED power, camera exposure — to image the target well enough for successful segmentation or scientific analysis. It is possible to automate the adjustment of such hardware settings; the SMWG is planning a separate module on that.- The
General Analysisrecipe must be predefined to segment the target object of interest, for example the three largest cells, or a dividing cell. Here it is a simple threshold segmentation. More complex segmentation is possible with General Analysis 3 and with Python in NIS-Elements.- If reusing the example job, it is advised to point the capture definitions at your own optical configurations.
Hazard considerations
- Before attempting this on a real microscope, check the focus-height and XY offsets between the low resolution and high resolution objectives before running the workflow unattended.
- Before running a job on hardware, be sure that no XY or Z crash can happen. Check the clearance of tall high-magnification objectives against the slide or plate holder over the full range of stage positions that the workflow may visit.
- Take care when mixing air and immersion objectives at the same XY position.
Reusing the example job
The job and its analysis recipe can be downloaded and imported into NIS-Elements:
The job file contains the capture definitions it was built with, and those call optical configurations that exist on the microscope it was made on. They will not match another system, so after importing, point each capture definition at your own optical configurations before running anything. The version of NIS-Elements the files were saved from, and the names of the optical configurations the job expects, are listed in
README.txtin the same folder.Step-by-step guidelines
- Set up imaging settings
- Define a low resolution capture definition (
Lo_Res, e.g. 4x) and a high resolution capture definition (Hi_Res, e.g. 40x)- Save both as named capture definitions so that they can be referenced by the JOBS workflow and re-used across samples
- Acquire the overview image
- Add a
Capturetask using theLo_Resdefinition- Set up image analysis
- Add a
General Analysistask operating on the captured overview image- Segment the target objects (here: nuclei) with a threshold
- Restrict the result to the objects to be re-imaged, using
Filter on ObjectArea→by Order→Keep Top(here: the 3 largest objects); additional feature filters such as circularity can be added- In the Calculations tab, define a region list (action
Replace, divisionPer Object). Each segmented object becomes one region; the list is what the acquisition loop iterates over. Give it a descriptive name (here:Found_Largest_3_Nuclei)
- Test the image analysis
- Run the analysis on a saved example overview image and check that the expected objects are found before running the full workflow
- Configure and run the feedback loop
- Add a
Region Loopiterating overFound_Largest_3_Nuclei.Regions- Inside the loop, add
Move to center of Regions.CurrentRegion- Inside the loop, add a
Capturetask using theHi_Resdefinition- Run the job
Notes on the segmentation step
Two segmentation strategies were tested for finding the target objects:
- Bright spot detection, with typical diameter and contrast as parameters. It takes object shape into account as well as intensity, which for round objects such as nuclei usually makes it the more robust of the two. Like thresholding, it returns a set of objects, which are then filtered down to the targets.
- Threshold +
Keep TopN by area, optionally combined with circularity filtering. Less shape-aware than bright spot detection, but simple to set up. Its result on the same field is the three-object image shown under Test the image analysis above.Thresholding is used in this example because it is the easier of the two to set up and to follow. On a cleaner sample — cultured nuclei, for instance — bright spot detection would be the better choice. Either way, the choice of how objects are detected is independent of the feedback loop itself, and swapping one for the other changes nothing else in the job. More complex methods, such as Cellpose or ConvPaint, are also available in NIS-Elements.


Assessment
Questions
- TODO?
- TODO?
Answers
- TODO
- TODO
Follow-up material
Recommended follow-up modules:
Learn more: