Very often, biological images contain locally varying background intensities. This hampers both segmentation and intensity quantification. However, often it is possible to generate a background image that can be subtracted in order to yield a foreground image with zero background. It is very important to know about this, because removing spatially varying background is a prevalent task in bioimage analysis.
Prerequisites
Before starting this lesson, you should be familiar with:
After completing this lesson, learners should be able to:
Understand how to use image filters for creating a local background image
Use the generated local background image to compute a foreground image
Concept map
graph TD
ii(Input image)
ii --> bgi[Background image]
bgi --> s[Subtract]
ii --> s
s --> fgi[Foreground image]
Figure
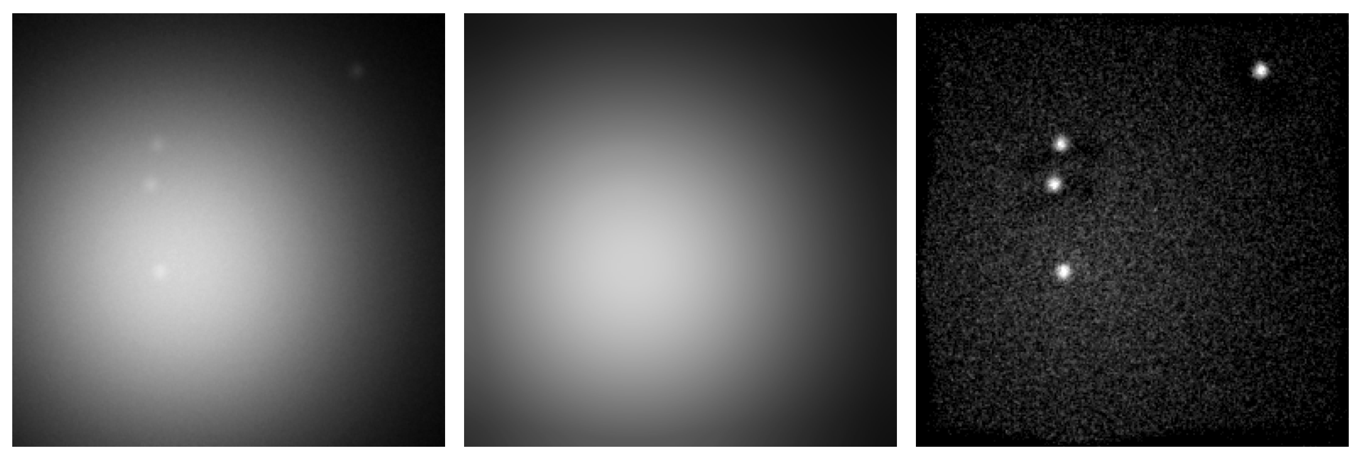
Local background correction using a median filter. Left - Raw data. Middle - Median filtered image (background). Right - Difference image (foreground).
There exist multiple methods on how to compute a background image.
Which methods and parameters work best depends on the specific input image and the size of the object of interest.
Common methods are:
Median filtering
Morphological opening. Subtraction of the opened image from the original image is also called Top-Hat filtering.
Some of the methods may be sensistive to noise. Therefore, it can be convenient to smooth the image, e.g. with a mean or gaussian filtering, prior computing the background image.
/**
* Fiji script for local background subtraction
*/// Parameters (please modify)//medianFilterRadius=15;// Code (rather not modify)//run("Close All");// Open dataopen("https://github.com/NEUBIAS/training-resources/raw/master/image_data/xy_8bit__some_spots_with_uneven_bg.tif");rename("input");// Create background imagerun("Duplicate...","title=background");run("Median...","radius="+medianFilterRadius);rename("background");// Create foreground imageimageCalculator("Subtract create 32-bit","input","background");rename("foreground");run("Tile");// Create line profiles for a more quantitative visualisation of the processmakeLine(99,200,81,121,82,87,91,64,230,26);selectWindow("foreground");run("Plot Profile");// Also create the same line profiler on the input imageselectWindow("input");run("Restore Selection");run("Plot Profile");
skimage napari
# %%
# Background subtraction using a median filter
# %%
# import modules
importnumpyasnpimportnaparifromOpenIJTIFFimportopen_ij_tifffromskimageimportfiltersfromskimage.morphologyimportdisk# %%
# Instantiate the napari viewer
viewer=napari.Viewer()# %%
# Read the image
image,*_=open_ij_tiff('https://github.com/NEUBIAS/training-resources/raw/master/image_data/xy_8bit__some_spots_with_uneven_bg.tif')# %%
# View the image
# - Appreciate that due to the strong uneven background it is impossible to segment the spots with a simple threshold
viewer.add_image(image)# %%
# Compute background image using a large median filter to remove the small foreground objects
background=filters.median(image,disk(15))viewer.add_image(background)# %%
# Compute a foreground image by subtracting the background image from the raw image
# - Convert to signed int16, because a subtraction can cause negative values, which we would like to keep
print(image.dtype,image.min(),image.max())foreground=image.astype('int16')-background.astype('int16')print(foreground.dtype,foreground.min(),foreground.max())# %%
# Add the image to napari and
# inspect the intensity image values in order to identify a threshold
# that segments the foreground dots
viewer.add_image(foreground)# %%
# Threshold the foreground image
binary_image_spots=foreground>8# Overlay the binary image
viewer.add_image(binary_image_spots)# %%
# Close the viewer (CI test requires this)
viewer.close()
Make a maximum intensity projection to create a background image ([Image › Stacks › Z Project…])
Use the image calculator function [ Process › Image Calculator…] to subtract the maximum intensity projection from the original:
Image1: xyt_8bit_polyp
Operation: Subtract
Image2: MAX_xyt_8bit_polyp
‘create new window’
‘32-bit float result’
Say ‘yes’ to the ‘Process entire stack’ message.
ImageJ Macro
// Open imageopen("https://github.com/NEUBIAS/training-resources/raw/master/image_data/xyt_8bit_polyp.tif");// Create maximum intensity projectionrun("Z Project...","projection=[Max Intensity]");// Subtract maximum intensity projection from original imageimageCalculator("Subtract create 32-bit stack","xyt_8bit_polyp.tif","MAX_xyt_8bit_polyp.tif");
ImageJ Jython
# Use a maximum intensity projection for background subtraction
# import packages
fromijimportIJfromij.pluginimportZProjector,ImageCalculator# open image
imp=IJ.openImage("https://github.com/NEUBIAS/training-resources/raw/master/image_data/xyt_8bit_polyp.tif")# create maximum intensity projection
maxproj=ZProjector().run(imp,"max all")# subtract maximum intensity projection from original image
background_subtracted=ImageCalculator().run(imp,maxproj,"Subtract create 32-bit stack")# show all images
imp.show()maxproj.show()background_subtracted.show()IJ.run("Tile")
skimage napari
# %%
# Background subtraction using a maximum intensity projection
# %%
importnumpyasnpfromOpenIJTIFFimportopen_ij_tiffimportnapariimportmatplotlib.pyplotasplt# Read the image
image,axes,scales,units=open_ij_tiff('https://github.com/NEUBIAS/training-resources/raw/master/image_data/xyt_8bit_polyp.tif')# %%
# Appreciate that this is a time-lapse image
print(image.shape,axes)# %%
# Instantiate the napari viewer
# - Appreciate that one cannot segment the polyp by one simple intensity threshold (two thresholds may work...)
viewer=napari.Viewer()viewer.add_image(image)# %%
# Create a background image by a maximum projection along the time axis
# - Remember the axis order 0=t, 1=y, 2=x
# - The background is bright and the object is moving, thus a maximum projection yields the background
background=np.max(image,axis=0)viewer.add_image(background)# %%
# Create foreground image
# - Cast to signed int16 to also allow negative values
foreground=image.astype('int16')-background.astype('int16')viewer.add_image(foreground)# %%
# Segment the polyp by simple thresholding of the foreground image
plt.hist(foreground.flatten(),bins=np.arange(foreground.min(),foreground.max()+1));plt.yscale('log')binary_polyp=foreground<-25viewer.add_image(binary_polyp)# %%
# Close the viewer (CI test requires this)
viewer.close()plt.close('all')
Assessment
True or false?
Mean filter is better than the median filter to generate a background image.
On the generated background image the objects of interest should not be visible.
When creating a background image by means of filtering: The size of the filter’s structuring element should be much smaller than the size of the objects.
Solution
False (mean filter is really quite poor in terms of removing foreground information)
True (because this is the background image, so it should not contain any foreground information)
False (it should be much (maybe ~3 times) larger in order to remove the objects from the image)