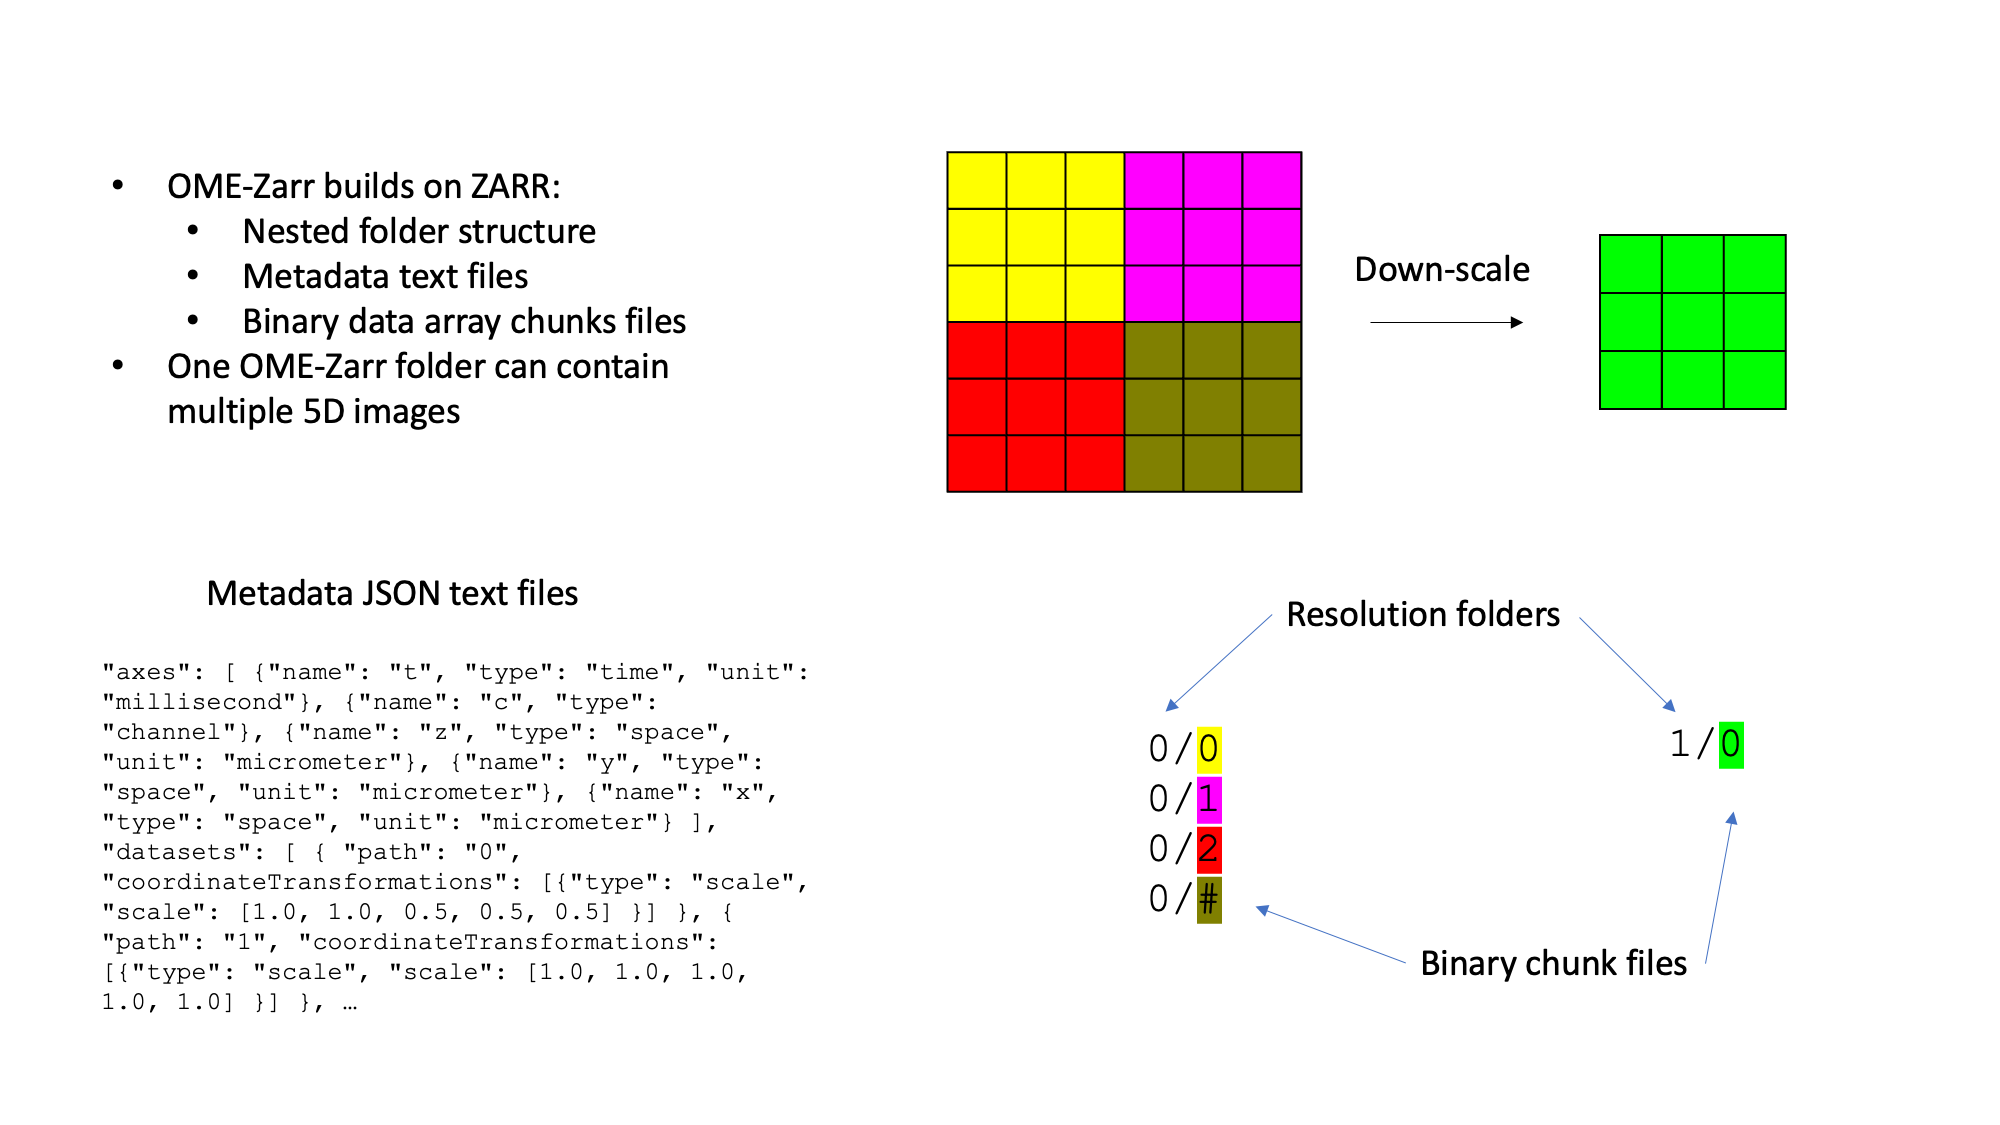
OME-Zarr
Storing TB-sized image data locally and in multiple copies is either not possible or inefficient. Cloud storage enables efficient concurrent access to the same image data by multiple clients (scientists). OME-Zarr is the emerging community standard image file format for cloud (S3 object store) compatible image data storage. Thus it is important to know how to access S3 hosted OME-Zarr in various image analysis and visualisation platforms.
Prerequisites
Before starting this lesson, you should be familiar with:
Learning Objectives
After completing this lesson, learners should be able to:
Understand the OME-Zarr image file format
Render cloud (S3 object store) hosted OME-Zarr image data
Access the pixel values of cloud hosted OME-Zarr image data
Apply basic image processing on cloud hosted OME-Zarr image data
Concept map
Figure
Activities
Open OME-Zarr
Open local (file system) and remote (S3 object store) OME-Zarr data using various tools.
Data for local exploration
- Please download and extract this OME-Zarr dataset
Show activity for:
Inspect OME-Zarr in the browser using ome-ngff-validator
Validate an OME-Zarr in the browser:
Enter the following into your browser:
https://ome.github.io/ome-ngff-validator/?source=Then paste the dataset url after the ‘equal’ sign, constructing the following link:
- Find out the metadata fields such as axes, units and scales.
- Check the array and chunk shapes and bytes per resolution level.
- Visualize a single chunk.
Note that with the remote url it is possible to copy the link from your browser and share it with your colleagues.
Open the OME-Zarr validator from the command line:
ome_zarr view /path/to/local/omezarr # eg: ~/image_data_course/data/zarr/6001240.zarrThe validator will open in a web browser.
Inspect OME-Zarr on the command line using minio-client
Note: This activity requires the minio-client to be installed. You can install it via conda using the command below. It is important to note that this conda installation is currently only supported on unix systems without an ARM architecture.
conda install -c joshmoore go-mcIf you are on Windows or on an ARM-based machine, follow the instructions from the provider:
Configure the S3 endpoint:
mc alias set uk1s3 https://uk1s3.embassy.ebi.ac.ukNo need to provide access and secret keys for this public resource. When requested to supply credentials, simply click
enter.Check out the contents of a bucket containing OME-Zarr data:
mc tree -d 1 uk1s3/idr/mc ls uk1s3/idr/zarr/v0.4/idr0062A/6001240.zarrCheck out the multiscales metadata for an example OME-Zarr dataset:
mc cat uk1s3/idr/zarr/v0.4/idr0062A/6001240.zarr/.zattrsCheck out the array metadata for the highest resolution array:
This will allow you to check how much data you have in each dimension and also how it is chunked.
mc cat uk1s3/idr/zarr/v0.4/idr0062A/6001240.zarr/0/.zarrayOther examples
mc alias set embl https://s3.embl.de
mc ls embl/i2k-2020/platy-raw.ome.zarr
mc cat embl/i2k-2020/platy-raw.ome.zarr/.zattrs | jq .
In the above example the
| jq .will result in a pretty printing of the JSON content of the.zattrsfile.
Inspect OME-Zarr in python using ome_zarr_py client
Use the ome_zarr tool for the inspecting and downloading OME-Zarrs from s3:
Remote OME-Zarr data stored in a public s3 bucket can be inspected and downloaded using the
ome-zarr-pytool.Inspect 3 different remote datasets:
ome_zarr info https://uk1s3.embassy.ebi.ac.uk/EuBI/anna_steyer0/20160112_C.elegans_std_fullhead.zarrome_zarr info https://uk1s3.embassy.ebi.ac.uk/idr/zarr/v0.4/idr0062A/6001240.zarrome_zarr info https://s3.embl.de/i2k-2020/platy-raw.ome.zarrOptional: Download the dataset
6001240.zarrfrom s3 to a local path:# cd ~/image_data_formats/day1/ome_zarr cd /path/to/local/zarr # where you want to keep the data on your system ome_zarr download https://uk1s3.embassy.ebi.ac.uk/idr/zarr/v0.4/idr0062A/6001240.zarrOptional: Inspect the local dataset in the same way:
ome_zarr info /path/to/local/zarr/6001240.zarr
Open local OME-Zarr in python using zarr-python
Import the necessary tools:
import zarr, os, pprint
import numpy as np
Open the local OME-Zarr using
zarr.open_group#path = f"{os.path.expanduser('~')}/image_data_course/data/zarr/6001240.zarr" path = "/path/to/local/zarr" dataset = zarr.open_group(path, mode = 'r') print(f"Type of the dataset: {type(dataset)}")Summarize group-level metadata:
dataset.infoNote the store type, the number of arrays and groups.
Note also the group named ‘labels’.Print the full metadata:
pprint.pprint(dict(dataset.attrs))Get multiscales metadata:
meta = dict(dataset.attrs['multiscales'][0])Print the axis ordering and the units
pprint.pprint(meta['axes'])
axis_order = ''.join(item['name'] for item in meta['axes'])
print(f"Axis order is {axis_order}")
Print the voxel scaling for each resolution level
for idx, transform in enumerate(meta['datasets']):
    print(f"\033[1mVoxel transform for the level {idx}:\033[0m")
    pprint.pprint(transform)
Get the top resolution array:
zarr_array0 = dataset[0]
print(f"Array type: {type(zarr_array0)}")
print(f"Shape of the top-level array: {zarr_array0.shape}")
Get a downscaled array:
zarr_array1 = dataset[1]
print(f"Array type: {type(zarr_array1)}")
print(f"Shape of the first-level downscaled array: {zarr_array1.shape}")
Summarize array-level metadata:
zarr_array0.info
zarr_array1.info
Print chunk size for the top layer:
print(f"Chunk size: {zarr_array0.chunks}")Convert the zarr array to a numpy array:
numpy_array0 = zarr_array0[:]
print(f"Array type: {type(numpy_array0)}")
# or use numpy directly
numpy_array0 = np.array(zarr_array0)
print(f"Array type: {type(numpy_array0)}")
Open remote OME-Zarr in python using zarr-python
Import the necessary tools:
import zarr, s3fs, os, pprint
import numpy as np
Open a remote OME-Zarr using
zarr.open_groupurl = "https://uk1s3.embassy.ebi.ac.uk/idr/zarr/v0.4/idr0062A/6001240.zarr" dataset = zarr.open_group(url, mode = 'r') print(f"Type of the dataset: {type(dataset)}")Summarize group-level metadata:
dataset.infoNote the store type, the number of arrays and groups.
Note also the group named ‘labels’.Print the full metadata:
pprint.pprint(dict(dataset.attrs))Get multiscales metadata:
meta = dict(dataset.attrs['multiscales'][0])Print the axis ordering and the units
pprint.pprint(meta['axes'])
axis_order = ''.join(item['name'] for item in meta['axes'])
print(f"Axis order is {axis_order}")
Print the voxel scaling for each resolution level
for idx, transform in enumerate(meta['datasets']):
    print(f"\033[1mVoxel transform for the level {idx}:\033[0m")
    pprint.pprint(transform)
Get the top resolution array:
zarr_array0 = dataset[0]
print(f"Array type: {type(zarr_array0)}")
print(f"Shape of the top-level array: {zarr_array0.shape}")
Get a downscaled array:
zarr_array1 = dataset[1]
print(f"Array type: {type(zarr_array1)}")
print(f"Shape of the first-level downscaled array: {zarr_array1.shape}")
Summarize array-level metadata:
zarr_array0.info
zarr_array1.info
Print chunk size for the top layer:
print(f"Chunk size: {zarr_array0.chunks}")Convert the zarr array to a numpy array:
numpy_array0 = zarr_array0[:]
print(f"Array type: {type(numpy_array0)}")
# or use numpy directly
numpy_array0 = np.array(zarr_array0)
print(f"Array type: {type(numpy_array0)}")
Open OME-Zarr in python using ome-zarr-py
Import the relevant tools:
import ome_zarr, zarr, pprint, os
from ome_zarr import utils
from ome_zarr.reader import Reader
from ome_zarr.io import parse_url
Use the utils module to inspect, download or validate the remote data
Inspect:
list(utils.info("https://uk1s3.embassy.ebi.ac.uk/EuBI/anna_steyer0/20160112_C.elegans_std_fullhead.zarr"))Download:
utils.download(input_path = "https://uk1s3.embassy.ebi.ac.uk/idr/zarr/v0.4/idr0062A/6001240.zarr",
               output_dir = "/path/to/local/zarr") # eg: "/home/oezdemir/image_data_formats/day1/ome_zarr"
Validate:
utils.view(input_path = "/local/path/to/6001240.zarr")Read remote OME-Zarr:
# local_path = f"{os.path.expanduser('~')}/image_data_course/data/zarr/6001240.zarr"
remote_path = f"https://uk1s3.embassy.ebi.ac.uk/idr/zarr/v0.4/idr0062A/6001240.zarr"
reader = Reader(parse_url(remote_path))
# Note here that 'parse_url' can parse both remote and local urls.
Note that ome-zarr-py uses the term ‘node’ for different zarr groups and reads them in a flat list.
Print the node information per resolution level:
nodes = list(reader())
for idx, node in enumerate(nodes):
    print(f"The node at the level {idx} is {node}")
Get the data and metadata of the top-level node:
dataset = nodes[0].data
meta = nodes[0].metadata
Check the ‘data’ instance to examine the array shape and the chunks for each resolution layer:
for idx, array in enumerate(dataset):
    print(f"The array {idx} is a {type(array)} and has shape {array.shape} and has chunks with shape {array.chunksize}")
Print the axis types and units of the arrays using the metadata instance
print(f"Axis properties of the dataset:")
pprint.pprint(meta['axes'])
Print the voxel sizes per resolution level (and any other voxel transforms that may exist)
for idx, transforms in enumerate(meta['coordinateTransformations']):
    print(f"\033[1mThe transform metadata for the level {idx}:\033[0m")
    print(f"{transforms}")
Open OME-Zarr in Fiji using MoBIE
- Open Fiji with MoBIE
- [ Plugins > MoBIE > Open > Open OME ZARR… ]
Image URI:https://s3.embl.de/i2k-2020/platy-raw.ome.zarr( Labels URI ):https://s3.embl.de/i2k-2020/platy-raw.ome.zarr/labels/cells( Labels Table URI ): TODO
Open OME-Zarr in Fiji using n5-ij
Open a remote OME-Zarr in Fiji
- Open the n5-ij in Fiji via:
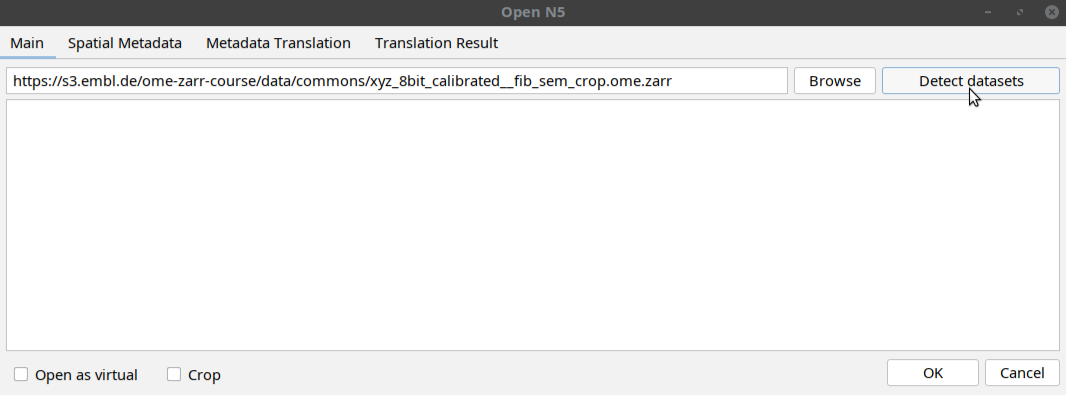
[ File > Import > HDF5/N5/Zarr/OME-NGFF ... ]- In the window that opens, paste the following path in the uri space:
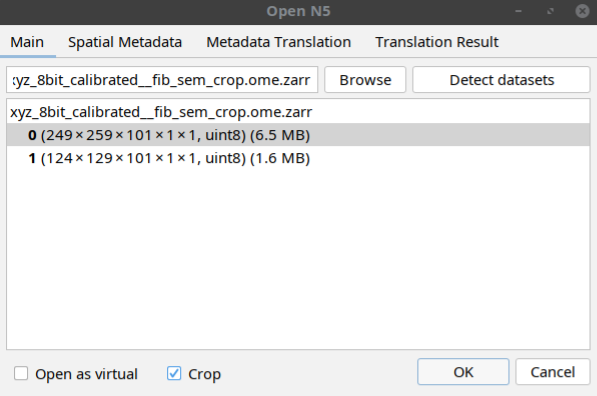
https://s3.embl.de/ome-zarr-course/data/commons/xyz_8bit_calibrated__fib_sem_crop.ome.zarrThen click
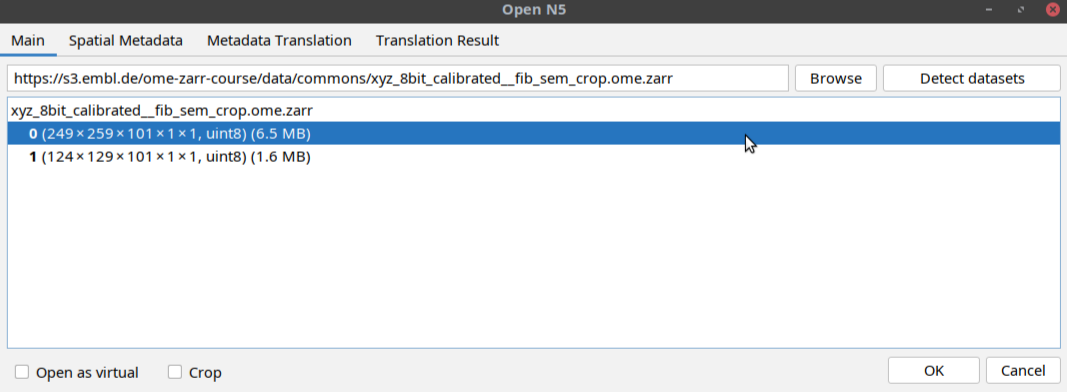
Detect datasetsbutton as shown below:The tool will display a multiscales schema with two datasets in the dialog box. Select one of the datasets as shown below and click OK:
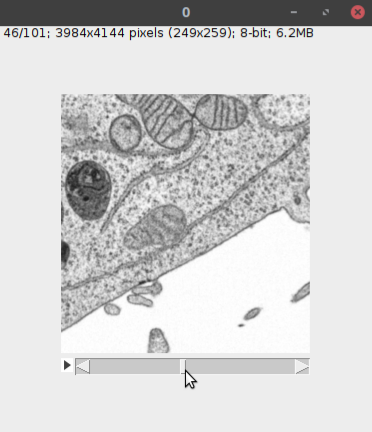
- This will open the dataset in Fiji as a normal Fiji image (see below).
Open a subset of a remote OME-Zarr in Fiji
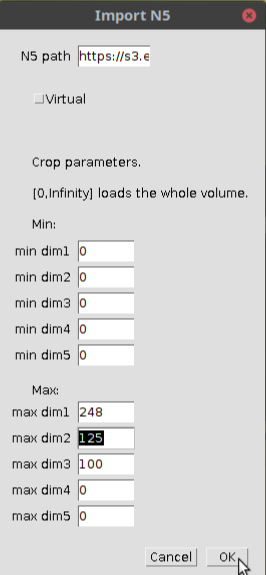
Follow the same steps above do select a dataset but instead of directly opening the dataset, click the crop button in the window before clicking OK as shown below:
In the window that open, select the indices of the subset as shown below:
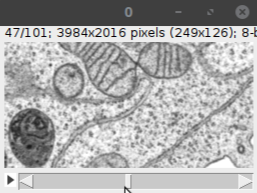
When you click OK, the specified subset of the image will be opened as shown below:
Open OME-Zarr in Fiji using n5-viewer
Open a remote OME-Zarr in BigDataViewer
Now let’s imagine the dataset you want to open is too large to fit the RAM of your machine.
- Open the n5-viewer in Fiji via:
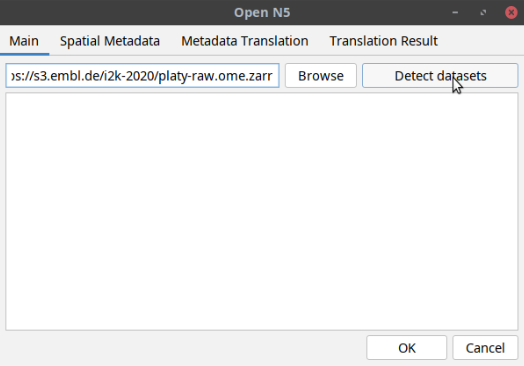
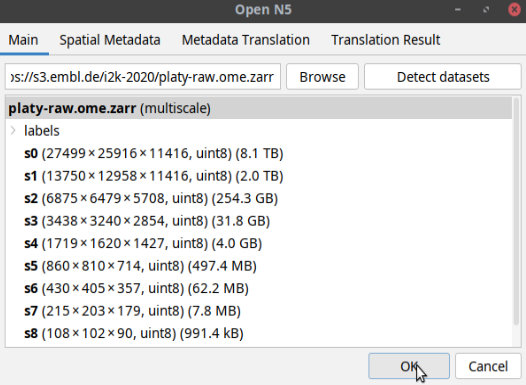
[ Plugins > BigDataViewer > HDF5/N5/Zarr/OME-NGFF Viewer ]- In the window that opens, paste the following path in the uri space:
https://s3.embl.de/i2k-2020/platy-raw.ome.zarrThen click
Detect datasetsbutton as shown below:
The tool will display a multiscales schema with 9 datasets in the dialog box. In this case, one can either open the individual datasets or the entire pyramid. To do the latter, click on the multiscale object and then click OK as shown below:
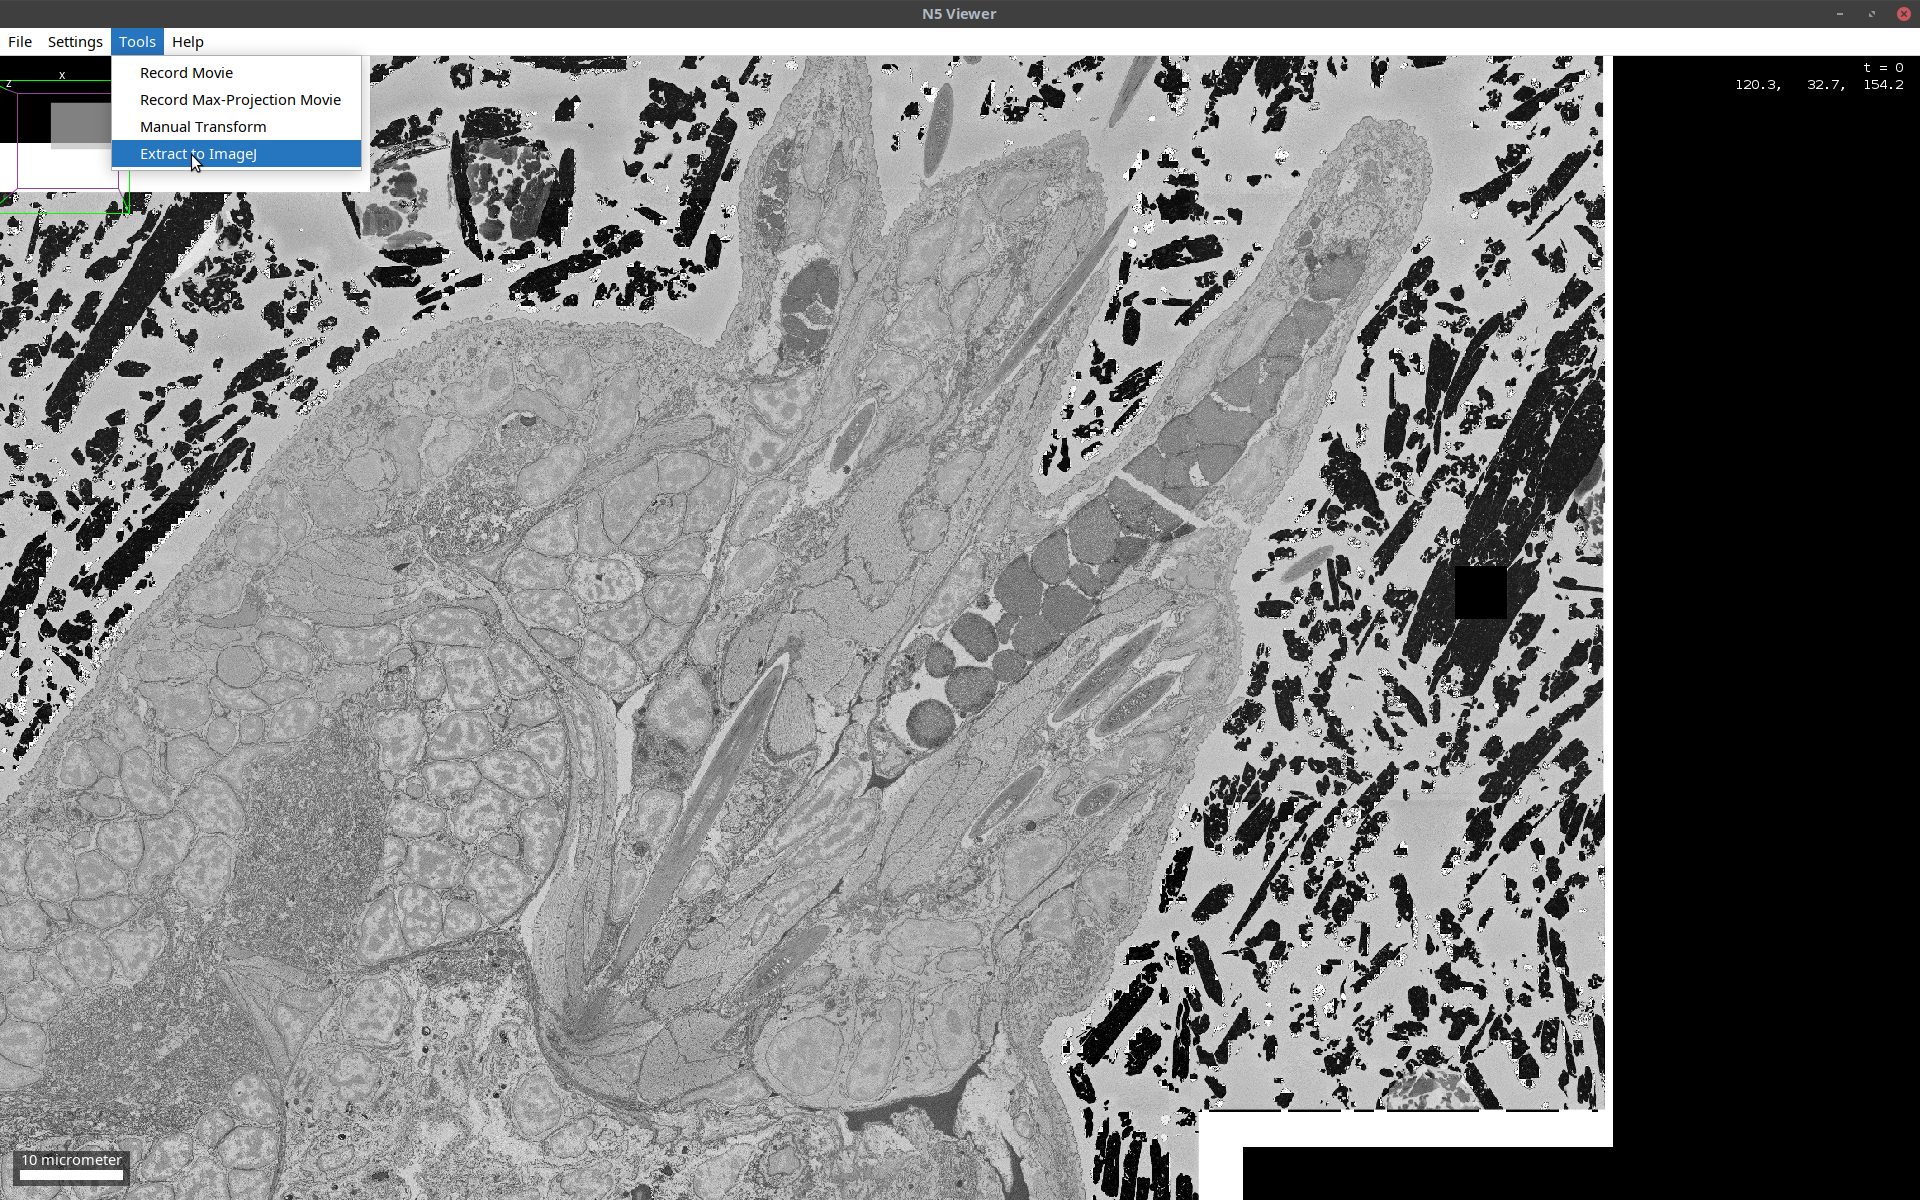
This will open the multiscales object in BDV as shown below:
This is a huge (terabyte-scale) image, which is not amenable to processing as a whole in Fiji. It is possible, however, to extract subsets of it to Fiji and continue with processing. To do so, follow the steps below:
- In the BDV window, open the cropping window via:
[ Tools > Extract to ImageJ ](also see below)
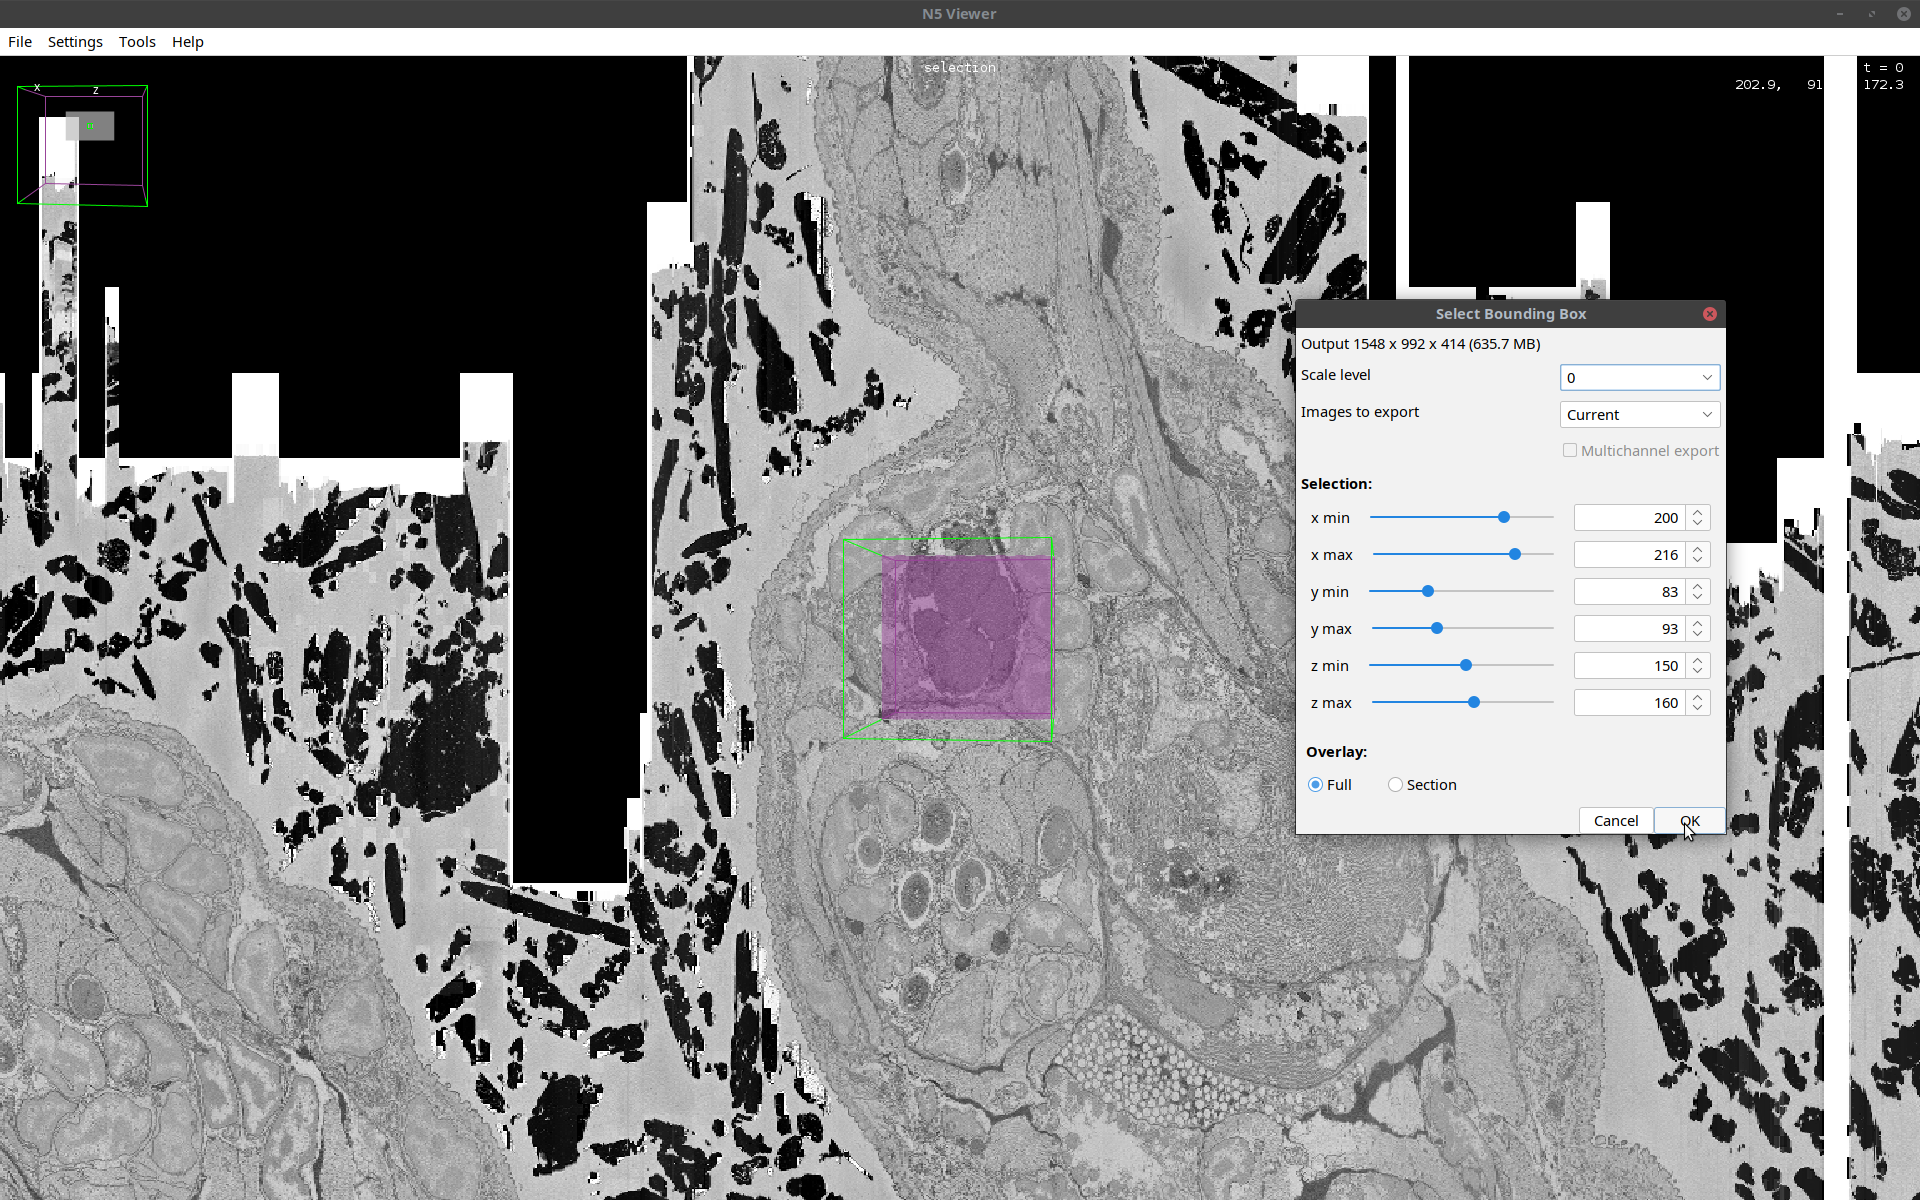
- In the cropping window that opens, select the indices of the subset as shown below:
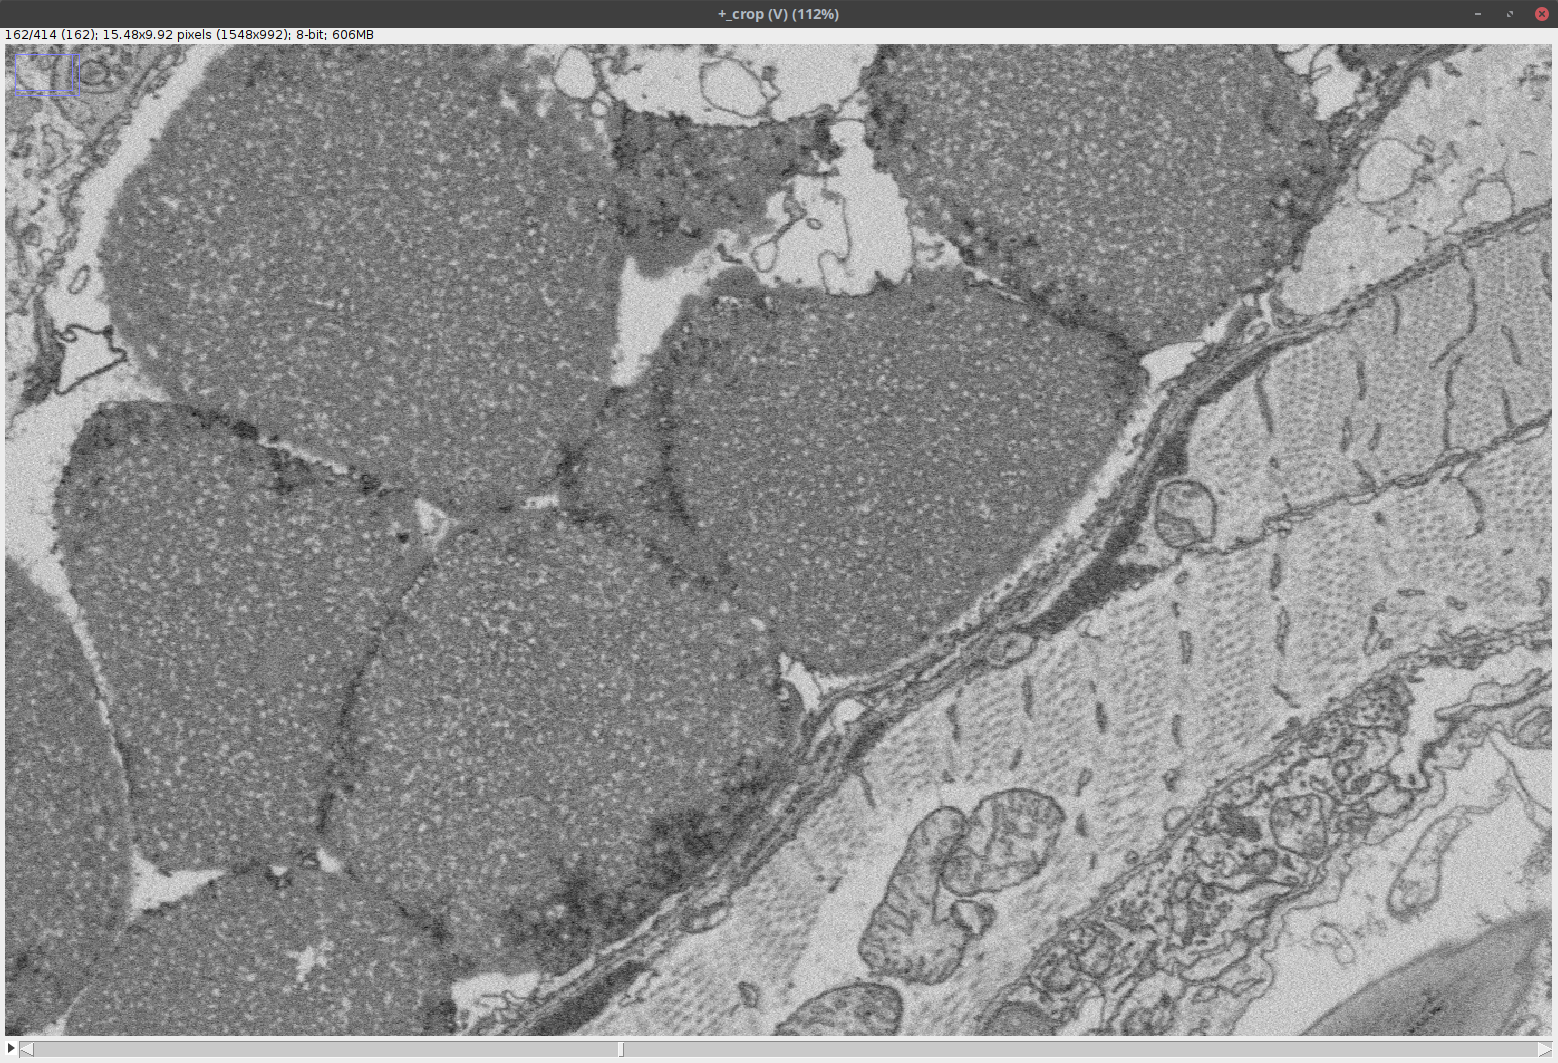
Note that this step may require incremental rotation of the image and adjustment of the bounding box until the desired region of interest is obtained. It is also important to check the size of the cropped volume at the top of the cropping window to make sure that it is not larger than the memory. Once you are fine with the settings, click OK.- The output is a standard Fiji image as shown below:
Note that this image has been loaded into the RAM; as such, it can be processed like any other Fiji image and saved to any desired file format.

Open OME-Zarr in napari
Visualise the remote data using Napari together with the napari-ome-zarr plugin.
Use command line:
napari --plugin napari-ome-zarr https://uk1s3.embassy.ebi.ac.uk/idr/zarr/v0.4/idr0062A/6001240.zarrUse Python code:
Approach 1: Open the full OME-Zarr from the top level url:
import napari

v = napari.Viewer()
v.open("https://uk1s3.embassy.ebi.ac.uk/idr/zarr/v0.4/idr0062A/6001240.zarr",
       plugin = 'napari-ome-zarr'
       )
napari.run()
Note that this approach automates a lot of tasks for the user, discovering look-up tables, pixel scalings and units from the OME-Zarr metadata.
Approach 2: Read arrays and open them individually:
import napari
import zarr, dask.array as da

url = "https://uk1s3.embassy.ebi.ac.uk/idr/zarr/v0.4/idr0062A/6001240.zarr"
gr = zarr.open_group(url, mode = 'r')
#array0 = da.from_zarr(gr[0])
array2 = da.from_zarr(gr[2])
#label_array0 = da.from_zarr(gr.labels['0'][0])
label_array2 = da.from_zarr(gr.labels['0'][2])
v = napari.Viewer()
#v.add_image(array0, contrast_limits = (0, 2000), colormap = 'yellow')
v.add_image(array2, contrast_limits = (0, 2000), colormap = 'red')
#v.add_labels(label_array0)
v.add_labels(label_array2)
napari.run()
Note that approach 2 is flexible but does not use any metadata. You have to specify the metadata to the viewer manually.
Open OME-Zarr in the browser using vizarr
Open OME-Zarr in the browser using neuroglancer
- Open an image:
- Go to https://neuroglancer-demo.appspot.com/
- On to top right in
Source, enter, e.g.,zarr://https://s3.embl.de/i2k-2020/platy-raw.ome.zarr(replace the part behindzarr://with your URL.- Press Enter (multiple times).
- Navigate around in the sample
- Zooming seems to require pinching on a trackpad
- Sharing views:
- The URL in your browser adapts to your current view
- Copy and paste the URL to share a view with a collaborator
- For example, try this one
Open OME-Zarr in the browser using webKnossos
Note that this loads data from
https://s3.embl.de/i2k-2020/platy-raw.ome.zarr
Open OME-Zarr in the browser using ITK viewer
Open OME-Zarr in the browser using BioImage Archive tools
https://uk1s3.embassy.ebi.ac.uk/bia-integrator-data/pages/S-BSST410/IM2.html
Save OME-Zarr
Save data to OME-Zarr using different tools.
Example input image data
- Please download xyz__multiple_images.czi to a convenient local directory.
For example:~/image_data_course/data/czi/xyz__multiple_images.czi
Show activity for:
Export OME-Zarr from Python using ome-zarr-py
Import the relevant tools:
import zarr, os
from ome_zarr import writer, scale
from ome_zarr.io import parse_url
from skimage.data import astronaut
from zarr.codecs import BloscCodec
Create fake data:
data = astronaut().swapaxes(0, 2).swapaxes(1, 2)Create a zarr store to write:
For the sake of simplicity, here we demonstrate how to write to a local store. It is also possible to write to a remote location by simply specifying a remote url as input to the
parse_urlfunction.# Specify the path where you want to write # output_path = f"{os.path.expanduser('~')}/image_data_formats/day2/astronaut.zarr" output_path = "/path/to/astronaut.zarr" # Parse the url as a zarr store. Note that "mode = 'w'" enables writing to this store. store = parse_url(output_path, mode = 'w').store root = zarr.open_group(store)Specify a scaler:
In order to create an image pyramid, one has to instantiate a scaler. This scaler requires the parameters: scale factor, number of resolution layers and downscaling method.
scaler = scale.Scaler(downscale=2, # Downscaling factor for x and y axes
                      max_layer=4, # Number of downscalings = 5
                      method = 'nearest' # downscaling method
                      )
Specify the axis identities and the corresponding units:
This dictionary will impose the axis order and the units corresponding to each axis.
axes = [
    dict(name = 'c', type = 'channel'),
    dict(name = 'y', type = 'space', unit = 'micrometer'),
    dict(name = 'x', type = 'space', unit = 'micrometer'),
]
Specify the voxel sizes for each resolution level:
This is a list of list, where the length of the outer list must match the number of resolution levels. The inner lists contain dictionaries for different types of coordinate transforms. Each inner list must contain a scaling transform, a dictionary that takes
scaleas key and an iterable of voxel sizes as value.coordinate_transforms = [ [{'scale': [1, 0.2, 0.2], 'type': 'scale'}], [{'scale': [1, 0.4, 0.4], 'type': 'scale'}], [{'scale': [1, 0.8, 0.8], 'type': 'scale'}], [{'scale': [1, 1.6, 1.6], 'type': 'scale'}], [{'scale': [1, 3.2, 3.2], 'type': 'scale'}] ]Specify zarr storage options
The most important zarr storage options are the
chunksand thecompressionparameters. Thechunksparameter is simply a tuple of integers corresponding to each axis. Thecompressionparameter requires compressor object from theNumcodecspackage, which is a dependency ofzarr-python.storage_options = dict( chunks=(1, 64, 64), # Output chunk size compressor=BloscCodec(cname="blosclz"), # Compressor to be used, choose one: ['blosclz', 'lz4', 'lz4hc', 'zlib', 'zstd'] overwrite=True # Overwrite existing data if any )Save the array:
Here we use the
ome_zarr.writer.write_imagefunction to save the array. This function takes the parameters specified above as input, downscales the array accordingly and writes the resulting pyramid to the specified zarr group.writer.write_image(image = data, # In this case, a numpy array group = root, axes = axes, # Dimensionality order scaler=scaler, coordinate_transformations = coordinate_transforms, storage_options = storage_options )
Export an image from Fiji as OME-Zarr
Export OME-Zarr from Fiji
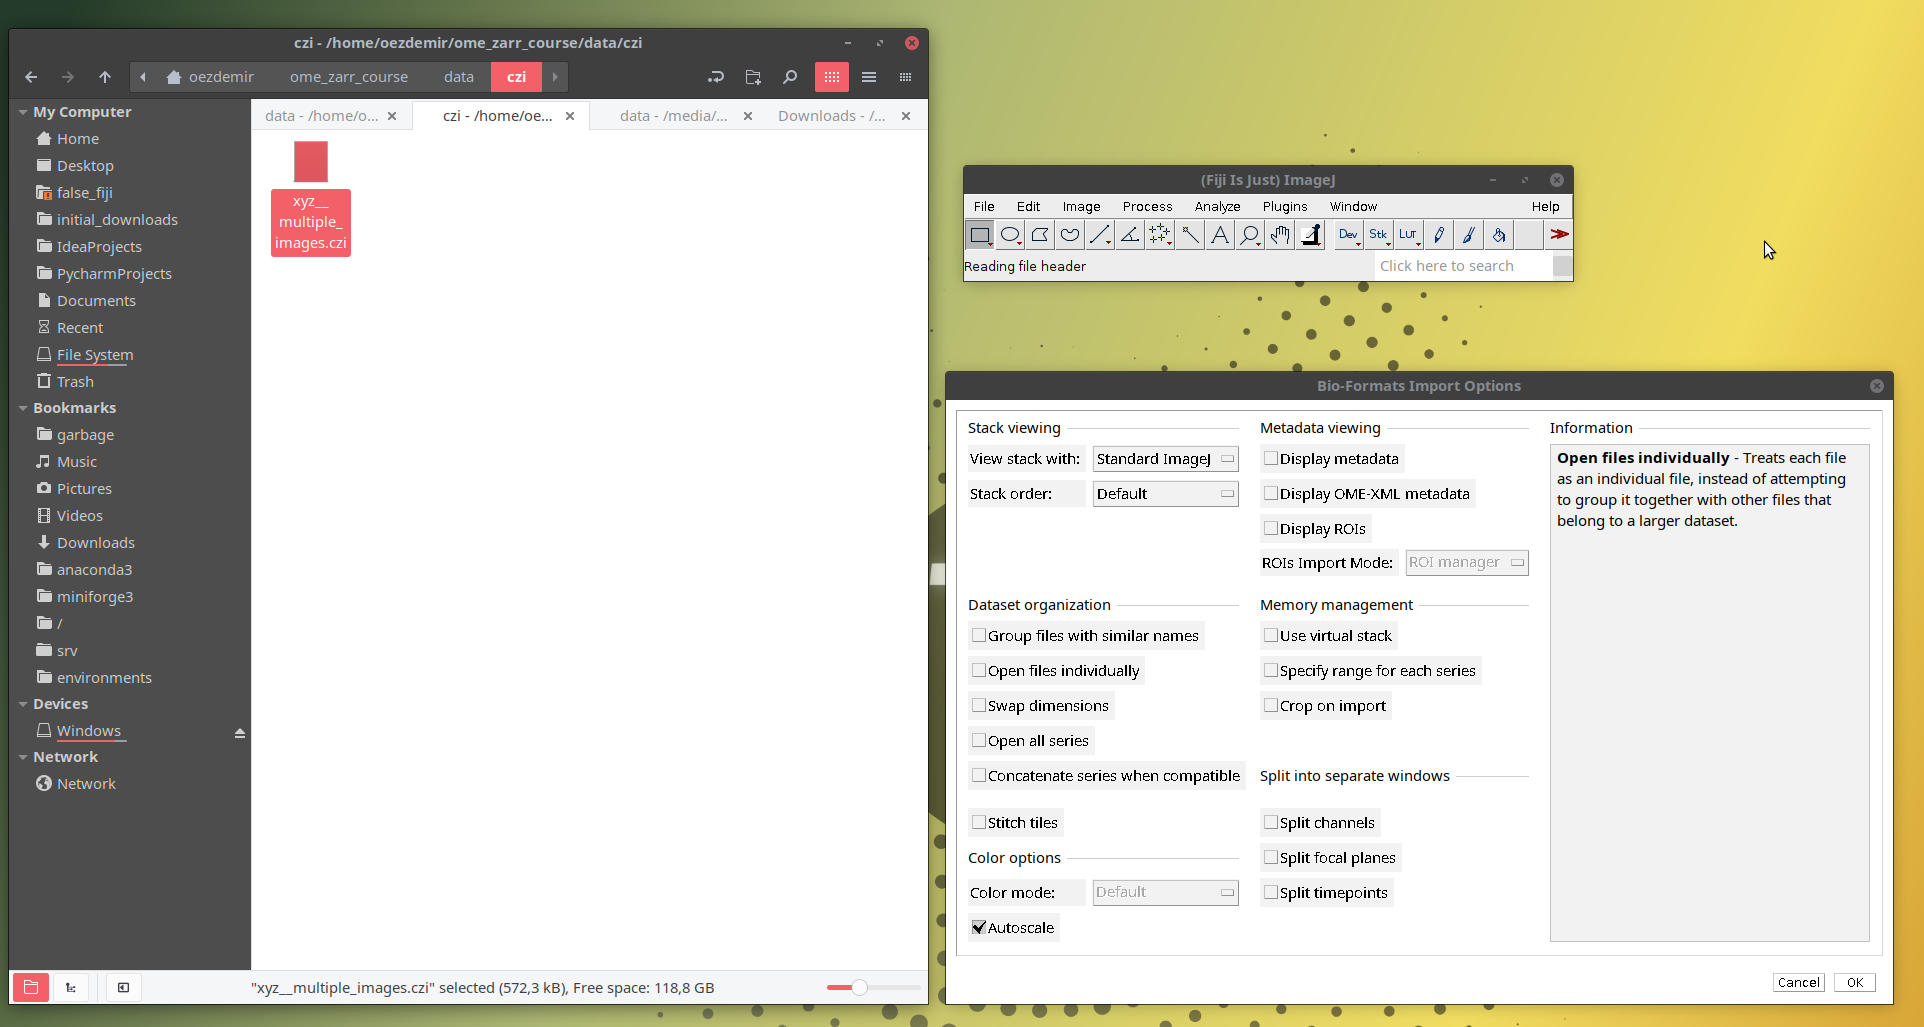
- Drag and drop the local czi image from your local path (eg.,
~/image_data_course/data/czi/xyz__multiple_images.czi) as shown below:- A window titled Bioformats Import Options will open. Then click OK without changing any options.
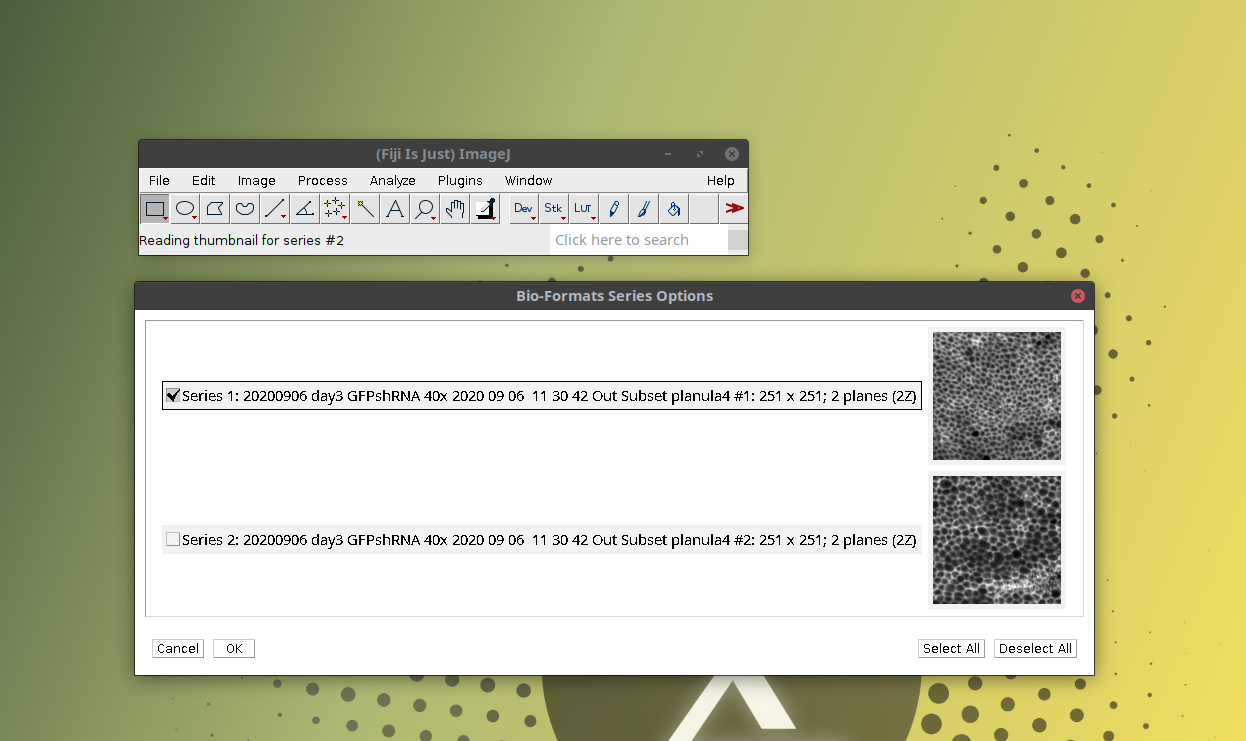
- Another window titled Bioformats Series Options will open. This shows that the czi file contains two independent images (or “series” in bioformats terminology). Then select one of the images and click OK as shown below:
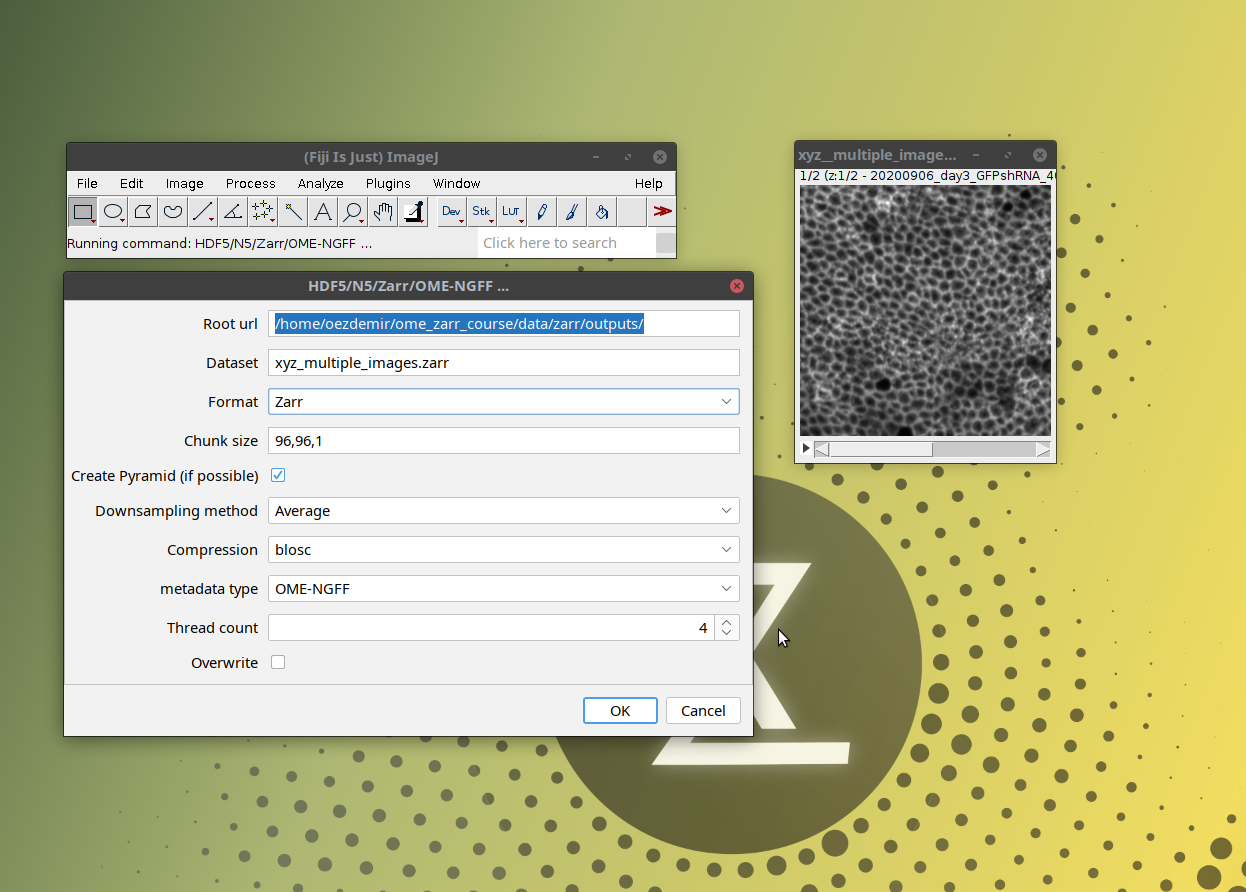
- Now open the n5-ij’s saving tool via:
[ File > Save As > HDF5/N5/Zarr/OME-NGFF ... ]as shown below
- This will open a window with saving options (which define the properties of the output OME-Zarr) as shown below:

Update the rendering metadata using zarr and ome-zarr-py
Import the necessary modules
import zarr, os
from ome_zarr.io import parse_url, utils
import matplotlib.colors as mcolors
At this stage inspect the image using the OME-Zarr validator:
# path = f"{os.path.expanduser('~')}/image_data_formats/day2/astronaut.zarr"
path = "/path/to/astronaut.zarr"
utils.view(path)
Define a utility function to get the hex color code by simple color names
def get_color_code(color_name):
    try:
        color_code = mcolors.CSS4_COLORS[color_name.lower()]
        return color_code
    except KeyError:
        return f"Color '{color_name}' not found."
Now add rendering metadata
store = parse_url(path, mode = 'w').store # Create a zarr store to save the data. Note that this can also be an s3 object store.
root = zarr.open_group(store=store)
root.attrs["omero"] = {
    "channels": [
        {
            "color": get_color_code('cyan'),
            "window": {"start": 0, "end": 255, "min": 0, "max": 255},
            "label": "ch0",
            "active": True,
        },
        {
            "color": get_color_code('magenta'),
            "window": {"start": 0, "end": 255, "min": 0, "max": 255},
            "label": "ch1",
            "active": True,
        },
        {
            "color": get_color_code('yellow'),
            "window": {"start": 0, "end": 255, "min": 0, "max": 255},
            "label": "ch2",
            "active": True,
        },
    ]
}
It is important to know here that not all OME-Zarr readers recognize each of these settings.
Apply the validator again to the data to see the changes:path = "/path/to/astronaut.zarr" utils.view(path)As the data looks valid, now visualize using different viewers to see if the rendering is working.
Convert
Create OME-Zarr data from data stored in monolithic file formats.
-
Download the tiff_series dataset and extract them to a convenient local directory.
For example:~/image_data_course/data/tiff/tiff_series - Open the files
- Observe that the files are the z sections of the same 3D image.
- Convert the files to OME-Zarr independently and as a single group
- Inspect the OME-Zarr
Show activity for:
BatchConvert
Perform parallelised conversion of image data collections to OME-Zarr using BatchConvert
Important note: BatchConvert is currently only supported on unix-based systems
As input, use the
tiff_seriesdataset.Perform parallelised, independent conversion:
batchconvert omezarr \
/path/to/tiff_series \
/path/to/output_dir
This command maps each input file in the
tiff_seriesfolder to a single OME-Zarr, which is then transferred to theoutput_dirfolder.Check the content of the
output_dirfolder:ls /path/to/output_dirOptional: Inspect the created OME-Zarr.
Perform grouped conversion:
batchconvert omezarr \
--merge_files \
/path/to/tiff_series \
/path/to/concatenated_output_dir
This conversion mode assumes that the input files are part of the same image and thus will merge them along a specific axis during the conversion process. The
--merge_filesflag specifies the grouped conversion option.Check the content of the
output_dirfolder:ls /path/to/concatenated_output_dirOptional: Inspect the created OME-Zarr.
Perform grouped conversion with specific chunking, downscaling and compression parameters:
batchconvert omezarr \
--merge_files \
--compression_zarr zlib \
-ms 32 \
-cx 32 \
-cy 32 \
-cz 6 \
/path/to/tiff_series \
/path/to/concatenated_rechunked_output_dir
Here we do not only concatenate images, but we create a resolution pyramid and specify chunk sizes in x, y and z dimensions.
Check the content of the
zarr_series_concatenated_rechunkedfolder:ls /path/to/concatenated_rechunked_output_dirOptional: Inspect the created OME-Zarr. Compare it to the one created earlier.
Assessment
Follow-up material
Recommended follow-up modules:
Learn more: