After completing this lesson, learners should be able to:
Understand the basic concept of the TIFF image data format
Understand that there are various TIFF variants, such as ImageJ-TIFF and OME-TIFF
Create OME-TIFF files
Convert other image data into OME-TIFF files
Inspect OME-TIFF image data and metadata
Concept map
graph TD
T("TIFF") --- I("Image data and metadata")
T --- P("Planar image data model")
T --- V("Variants exist")
V --- OT("OME-TIFF is an important variant")
Figure
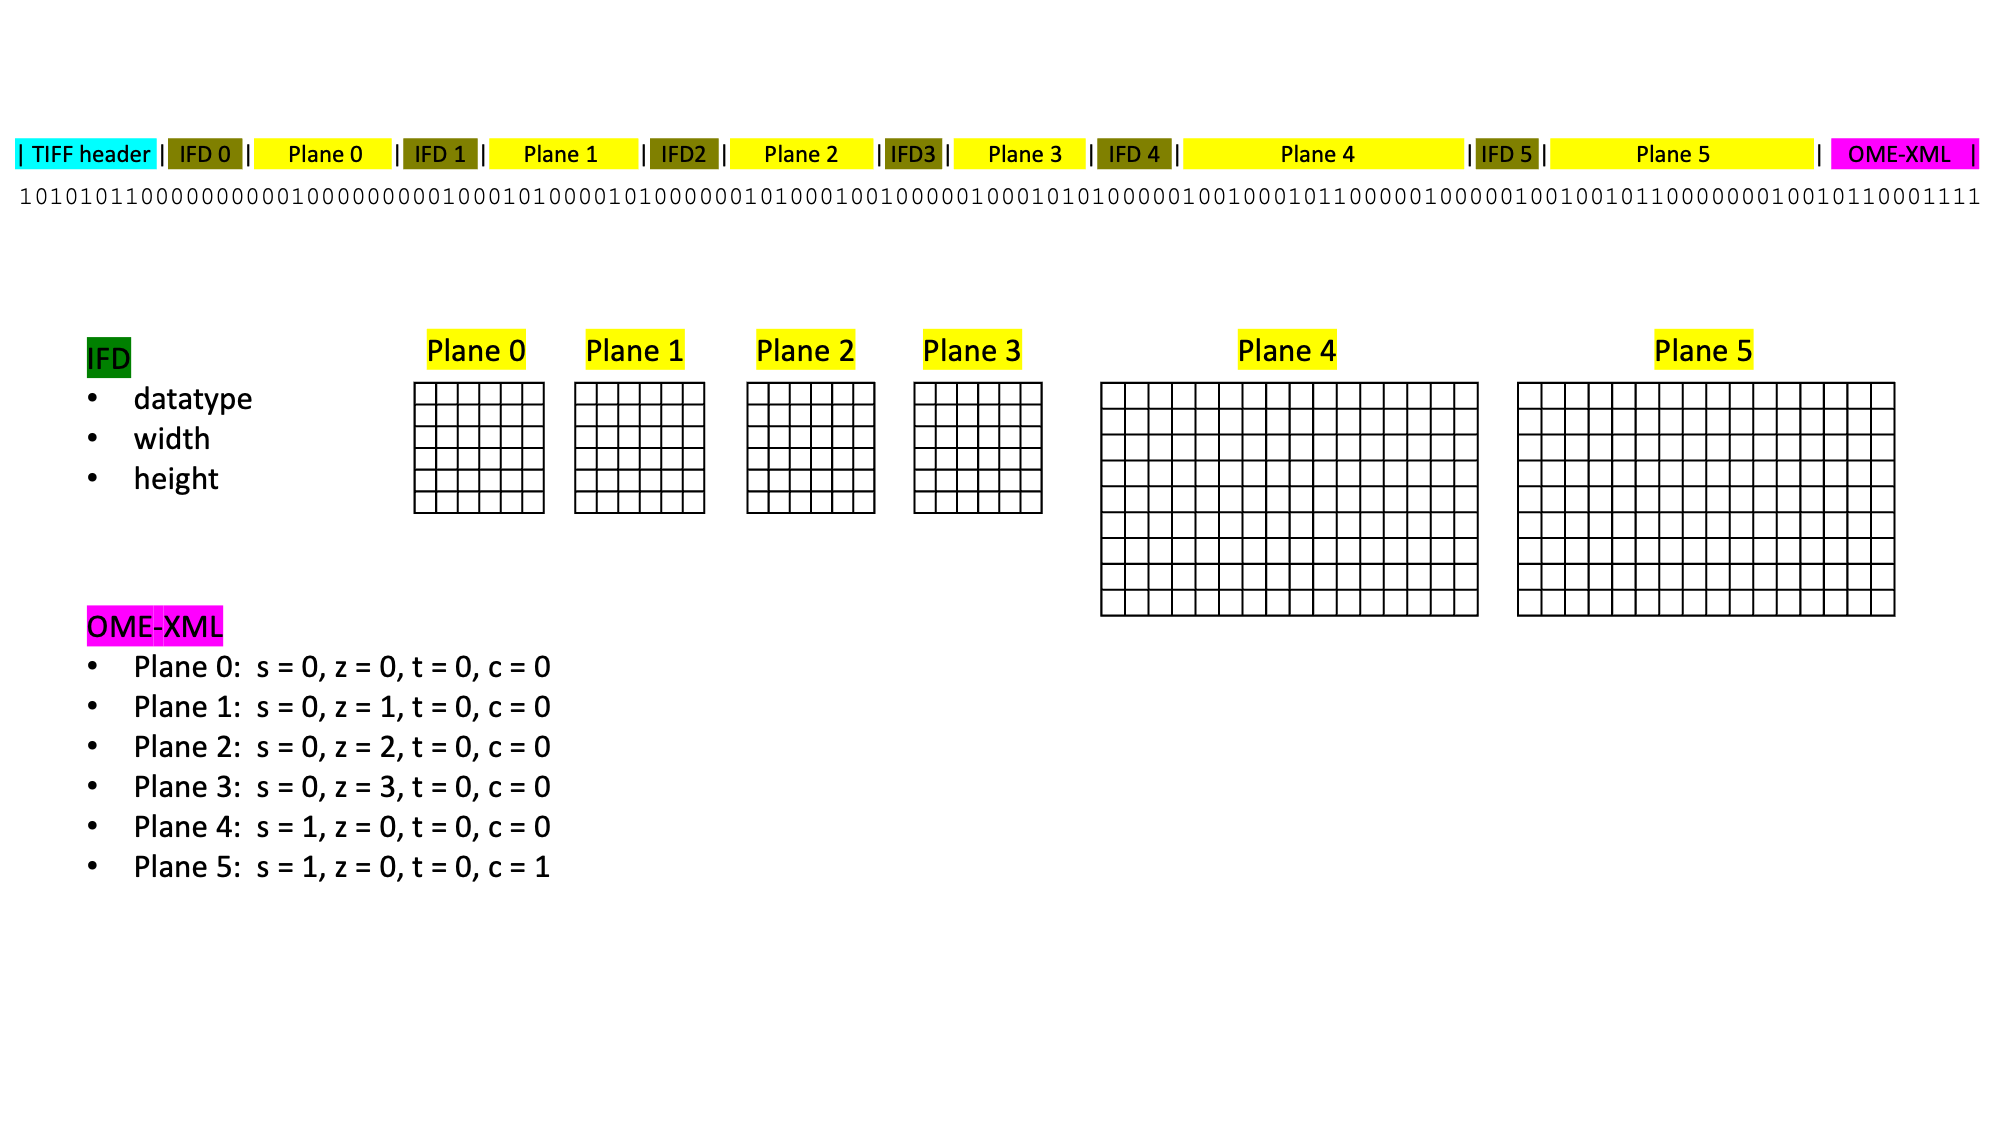
TIFF is a planar file format, where one TIFF file can contain multiple image planes of different sizes and different data types, which are specified in the respective IFD block. OME-TIFF features an additional OME-XML metadata block, which describes additional important microscopy metadata such as the mapping of IFDs to channel, time-point, and z-plane. In addition, OME-TIFF supports storing different image series within one TIFF file. Within an images series the image datatype, width and height are the same for all planes. In the figure, the OME-TIFF contains two image series, where the first is a z-stack and the second is a multi-channel image.
General comments
The TIFF file format is already complex and the OME-TIFF variant is adding even more metadata on top. To fully understand everything is way beyond the aim of this training material. We will just scratch the surface to understand the most important concepts.
IFDs and image planes
TIFF is a planar image data format. Internally there are always pairs of IFD and data blocks. IFD stands for “Image File Directory” and contains information about where the corresponding image data block can be found in the file, the image width and height, as well as its datatype.
One TIFF file can contain many IFD/data pairs.
The IFD/data pairs may contain images of different sizes and different datatypes.
Physical pixel size
The TIFF format does natively support storing pixel size metadata, typically in units of centimetre or inches.
Resolution pyramids and chunking
The TIFF format supports the concept of resolution pyramids, and chunked storage of pixels within one plane. However there is no 3-D chunking available. Thus, TIFF can in fact be used as a 2-D big image data format.
Channels, z-planes, and time points
The TIFF format does not natively support storing information about which channel, z-plane or time-point an IFD/data pair belongs to. This bioimaging specific information is handled by additional metadata of TIFF variants, such as OME-TIFF.
Open the OME-XML metadata of this file and try to understand it
Interesting entries entail:
PixelPhysicalSize
Show activity for:
Fiji Bio-Formats GUI
Open Fiji
Drag and drop the OME-TIFF image onto Fiji
The Bio-Formats Importer will open
[X] Display OME-XML metadata
[ OK ]
Observe that there are only two datasets, but stored at different resolution levels
Select all images
[ OK ]
Inspect the OME-XML metadata
Python/BioIO
# %%
# Open a ome.tiff image file
# minimal conda env for this module
# conda create -n ImageFileFormats python=3.10
# activate ImageFileFormat
# pip install bioio bioio-tifffile bioio-lif bioio-czi bioio-ome-tiff bioio-ome-zarr notebook
# Note: for only dealing with ome.tif just do pip install bioio bioio-ome-tiff
# %%
# Load .ome.tiff file
# Please download the image from 'https://github.com/NEUBIAS/training-resources/blob/master/image_data/xy_xyc__two_images.ome.tiff'
# save image in your current directory in a folder called ExampleImages
# - Observe that BioImage chooses the correct reader plugin
frombioioimportBioImagefrompathlibimportPathbioimage=BioImage(Path().cwd()/'ExampleImages/xy_xyc__two_images.ome.tiff')print(bioimage)print(type(bioimage))# %%
# Inspect the number of images in the file
print(f'Number of Images: {bioimage.scenes}')# %%
# Inspect dimension and shape of the first image
bioimage.set_scene(0)print(f'Image dimension: {bioimage.dims}')print(f'Dimension order is: {bioimage.dims.order}')print(f'Image shape: {bioimage.shape}')# %%
# Extract image data (5D)
image_data=bioimage.dataprint(f'Image type: {type(image_data)}')print(f'Image array shape: {image_data.shape}')# Extract specific image part
image_data=bioimage.get_image_data('YX',C=1)print(f'Image type: {type(image_data)}')print(f'Image array shape: {image_data.shape}')# %%
# Read pixel size
print(f'Pixel size: {bioimage.physical_pixel_sizes}')# Read metadata
print(f'Metadata type: {type(bioimage.metadata)}')# print(f'Metadata: {bioimage.metadata}')
# %%
# Inspect dimension and shape of the second image
bioimage.set_scene(1)print(f'Image dimension: {bioimage.dims}')print(f'Dimension order is: {bioimage.dims.order}')print(f'Image shape: {bioimage.shape}')# %%
# Extract image data (5D)
image_data=bioimage.dataprint(f'Image type: {type(image_data)}')print(f'Image array shape: {image_data.shape}')# %%
# Read pixel size
print(f'Pixel size: {bioimage.physical_pixel_sizes}')# Read metadata
print(f'Metadata type: {type(bioimage.metadata)}')# print(f'Metadata: {bioimage.metadata}')
It is critical to add the ome.tif or ome.tiff extension!
Files of Type: Due to inconsistent behaviour (e.g., PNG extension is automatically added, OME-TIFF extensions are not added) we recommended not to select anything here, but rather manually specify the respective extension in the “File Name”
Observe that there are useful options, allowing you to
split the image into multiple files
compress the image data
Open the file again in Fiji and check which metadata has been preserved
For us, the channel LUTs were not preserved (January 2025)
Python/BioIO
# %%
# Save a ome.tiff image file
# minimal conda env for this module
# conda create -n ImageFileFormats python=3.10
# activate ImageFileFormat
# pip install bioio notebook
# %%
# Create a random image to save
importnumpyasnpimage=np.random.rand(512,512)# %%
# Save as OME Tiff
frombioio.writersimportOmeTiffWriterfrompathlibimportPathOmeTiffWriter.save(data=image,# image to save
uri=Path().cwd()/'TestImage.ome.tiff',# path to save to
dim_order='YX')# dimension order
# %%
# Save two images in one ome tiff
# generate two images
image0=np.random.rand(3,512,512)image1=np.random.rand(256,256)# add some pixel size data
frombioio_base.typesimportPhysicalPixelSizespixelsize0=PhysicalPixelSizes(Z=0.3,Y=0.1,X=0.1)pixelsize1=PhysicalPixelSizes(Z=None,Y=0.5,X=0.5)OmeTiffWriter.save(data=[image0,image1],uri=Path().cwd()/'TwoImages.ome.tiff',dim_order=['ZYX','YX'],physical_pixel_sizes=[pixelsize0,pixelsize1])
Observe that the LIF and CZI files contain multiple independent images
Observe that the images in the LIF file have different dimensions
Take note of important metadata, such as the spatial calibration
Convert the files to OME-TIFF
Open the OME-TIFFs
Check whether the image data and metadata have been preserved
Data
Download the image files image.lif
and xyz__multiple_images.czi to a convenient local directory.
For example: ~/image_data_course/data/czi/xyz__multiple_images.czi
Show activity for:
NGFF-Converter
This activity uses the NGFF Converter to convert a LIF image data set into an OME-TIFF image data set; and it uses Fiji to inspect the content of both the LIF and the OME-TIFF.
Inspect LIF using Fiji:
Drag and drop the LIF image onto Fiji
The Bio-Formats Importer will open
[X] Display OME-XML metadata
[ OK ]
Select all images
[ OK ]
Take note of
Number of images
For each image note its dimensions and spatial calibration
Inspect the OME-XML metadata and note down some values that you deem important
Repeat the same steps as for the original LIF file
Check whether all image data and metadata has been preserved
Key points
The NGFF converter is a nice tool to create OME-TIFF
OME-TIFF can contain multiple image data sets
OME-TIFF can contain resolution pyramids
Python/BioIO
# %%
# Open a ome.tiff image file
# minimal conda env for this module
# conda create -n ImageFileFormats python=3.10
# activate ImageFileFormat
# pip install bioio bioio-tifffile bioio-lif bioio-czi bioio-ome-tiff bioio-ome-zarr notebook
# Note: for only dealing with ome.tif just do pip install bioio bioio-ome-tiff
# %%
# Load .lif file
frombioioimportBioImageimage_url="https://github.com/NEUBIAS/training-resources/raw/master/image_data/xy_xyc__two_images.lif"bioimage=BioImage(image_url)# %%
# Option 1:
frompathlibimportPathbioimage.save(Path().cwd()/'converted_file.ome.tiff')# Option 2:
BioImage(image_url).save(Path().cwd()/'direct_conversion.ome.tiff')
bfconvert
This activity uses the bfconvert tool to convert a czi image data set to the OME-TIFF format;
and it uses Fiji to inspect the content of the OME-TIFF data.
Note that bfconvert is capable of generating a variety of other formats (in addition to OME-TIFF)
such as tiff, png, jpeg, OME-XML, etc., although we will focus on the OME-TIFF in this activity.
Before starting, make sure you have downloaded the xyz__multiple_images.czi somewhere convenient.
We refer to this input path as /path/to/xyz__multiple_images.czi.
Also create an output folder for OME-TIFF. We refer to this output folder as /path/to/OME-TIFFs